Mealybug – Pest

Mealybug

Mealybugs are part of the insect families collectively known as scale insects. They are soft-bodied, without the outer shell associated with insects in the other scale insect families. Instead, mealybugs are usually covered with a white waxy powder

Mealybugs have sucking mouthparts. Feeding weakens and stunts plants, causes leaf distortion, yellowing, and even total leaf loss. In some cases, plants can be killed. Mealybugs also produce large amounts of honeydew (similar to that produced by whiteflies and aphids), which can coat plants and surrounding surfaces with a sticky layer. A black fungus commonly known as “sooty mold” grows on the honeydew. The presence of honeydew and sooty fungus is one way to detect infestations of these insects.

Life Cycle. The citrus mealybug female can produce about 600 eggs, which are produced in cottony structures called ovisacs. Eggs may be produced with or without males. The eggs hatch in less than 10 days into small nymphs called crawlers. The crawlers move about the plants and locate feeding sites. Once the insects settle, there is not much movement. Under favorable conditions, there may be six generations per year. In reality, generations overlap, so all developmental stages will be present.

Control

Many chemical insecticides list mealybugs.

Non-chemical Control:

– Rubbing Alcohol Spray: Mix 1 to 2 cups alcohol per quart of water. Using undiluted alcohol as a spray is very risky for plants. Since alcohol can damage plants always test your spray mix on a few leaves of plants first. If the spray kills the pests and no leaf damage shows within the next 2 or 3 days, go ahead and spray further, using exactly the same ingredients and proportions you tested. If an infestation is well-established, it will be necessary to make a series of applications, at 10 to 14-day intervals, for mealybug control.

– Insecticidal soap spray according to the dilution on the label but substitute alcohol for half of the water required.

– Horticultural Oil and Insecticidal Soap Sprays: Are effective non-chemical controls for mealybugs and other soft-bodied pests. Oil sprays suffocate the insects and can aid in controlling scale crawlers and eggs, while soap sprays cause the insect’s cell membranes to rupture effectively causing it to desiccate.

Snails and Slugs – Pest

Snails and slugs

– move by gliding along on a muscular “foot.” This muscle constantly secretes mucus, which later dries to form the silvery “slime trail” that signals the presence of either pest. Slugs and snails are hermaphrodites, so all have the potential to lay eggs. Adult brown garden snails lay about 80 spherical, pearly white eggs at a time into a hole in the topsoil. They may lay eggs up to six times a year. It takes about 2 years for snails to mature. Slugs reach maturity after about 3 to 6 months, depending on species, and lay clear oval to round eggs in batches of 3 to 40 under leaves, in soil cracks, and in other protected areas.

Snails and slugs are most active at night and on cloudy or foggy days. On sunny days they seek hiding places out of the heat and bright light; often the only clues to their presence are their silvery trails and plant damage. In mild-winter areas such as southern coastal locations, young snails and slugs can be active throughout the year.

During cold weather, snails and slugs hibernate in the topsoil. During hot, dry periods or when it is cold, snails seal themselves off with a parchmentlike membrane and often attach themselves to tree trunks, fences, or walls.

Snails and slugs feed on a variety of living plants as well as on decaying plant matter. On plants they chew irregular holes with smooth edges in leaves and flowers and can clip succulent plant parts. They can also chew fruit and young plant bark. Because they prefer succulent foliage or flowers, they are primarily pests of seedlings and herbaceous plants, but they are also serious pests of ripening fruits, such as strawberries, artichokes, and tomatoes, that are close to the ground.

Eliminate and Control

A good snail and slug management program relies on a combination of methods. The first step is to eliminate, to the extent possible, all places where snails or slugs can hide during the day. Boards, stones, debris, weedy areas around tree trunks, leafy branches growing close to the ground, and dense ground covers such as ivy are ideal sheltering spots. There will be shelters that are not possible to eliminate—e.g., low ledges on fences, the undersides of wooden decks, and water meter boxes. Make a regular practice of trapping and removing snails and slugs in these areas. Also, locate vegetable gardens or susceptible plants as far away as possible from these areas. Reducing hiding places allows fewer snails and slugs to survive. The survivors congregate in the remaining shelters, where they can more easily be located and removed. Switching from sprinkler irrigation to drip irrigation will reduce humidity and moist surfaces, making the habitat less favorable for these pests. Choose snail-proof plants for areas where snails and slugs are dense. Copper barriers can be useful for protecting especially susceptible plants. Though baits can be part of a management program for snails and slugs, by themselves they don’t provide adequate control in gardens that contain plenty of shelter, food, and moisture.

Handpicking can be very effective if done thoroughly on a regular basis. Snails and slugs can be trapped under boards or flower pots positioned throughout the garden and landscape. Several types of barriers will keep snails and slugs out of planting beds. The easiest to maintain are those made with copper flashing and screen. Copper barriers are effective because it is thought that the copper reacts with the slime that the snail or slug secretes, causing a flow of electricity. Vertical copper screens can be erected around planting beds. The screen should be 6 inches tall and buried several inches below the soil to prevent slugs from crawling through the soil beneath the barrier. Snails and slugs have many natural enemies, including ground beetles, pathogens, snakes, toads, turtles, and birds, but most are rarely effective enough to provide satisfactory control in the garden.

Snail and slug baits can be effective when used properly in conjunction with a cultural program incorporating the other methods discussed above. However, baits alone will not effectively control snails or slugs. Several types of snail and slug bait products are available. Baits containing the active ingredient metaldehyde are most common. Metaldehyde baits are particularly poisonous to dogs and cats, and the pelleted form is especially attractive to dogs. Metaldehyde snail baits should not be used where children and pets cannot be kept away from them. Some metaldehyde products are formulated with carbaryl, partly to increase the spectrum of pests controlled to include soil and debris-dwelling insects, spiders, and sowbugs. However, carbaryl is toxic to soil-inhabiting beneficials like ground beetles and earthworms and should be avoided if snail and slug management is all that is required. Metaldehyde baits containing 4% metaldehyde are significantly more effective than those products containing only 2% metaldehyde; however, they are also more toxic to dogs and wildlife. Most currently available 4% products are formulated for use in enclosed bait stations to minimize their hazard.

Avoid getting metaldehyde bait on plants, especially vegetables. Baits containing only metaldehyde are most reliable when temperatures are warm or following a rain when snails and slugs are active. Metaldehyde does not kill snails and slugs directly unless they eat a substantial amount; rather, it stimulates their mucous-producing cells to overproduce mucous in an attempt to detoxify the bait. The cells eventually fail and the snail dies. When it is sunny or hot, they die from desiccation. If baiting is followed by cool and wet weather, they may recover if they ingest a sublethal dose. Do not water heavily for at least 3 or 4 days after bait placement; watering will reduce effectiveness and snails may recover from metaldehyde poisoning if high moisture conditions occur. Most metaldehyde baits break down rapidly when exposed to sunlight; however, some paste or bullet formulations (such as Deadline) hold up somewhat longer under conditions of sunlight and moisture.

A recently registered snail and slug bait, iron phosphate (available under many trade names including Sluggo and Escar-Go), has the advantage of being safe for use around domestic animals, children, birds, fish, and other wildlife and is a good choice for a garden IPM program. Ingestion of the iron phosphate bait, even in small amounts, will cause snails and slugs to cease feeding, although it may take several days for the snails to die. Iron phosphate bait can be scattered on lawns or on the soil around any vegetables, ornamentals, or fruit trees to be protected. Iron phosphate baits may be more effective against snails than slugs.

Plumeria Caterpillar

Plumeria Caterpillar

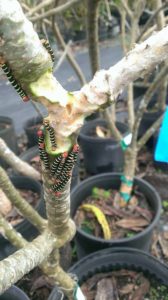
The caterpillars are the larvae of the frangipani moth, also known as Pseudosphinx tetrio. At up to six inches in length, the plumeria caterpillar is an impressive sight. Its bright coloration warns birds and other predators that it is not a very tasty meal. The caterpillar feeds on the plumeria tree, which produces a poisonous sap. The caterpillar is not harmed by eating the sap and it actually makes itself toxic and foul tasting to predators in the process. After the caterpillar gorges itself, it drops and buries beneath the ground to metamorphosize into a large hawk moth. (photo by Hetty Ford)

They feed primarily on the plumeria tree and plant and occasionally Allamanda and Desert Rose. They do not damage crops or ornamental flowers. As to fears of pets like dogs and cats playing with and biting the caterpillars, the insects’ coloring suggests to predators not to eat them as they may be poisonous, and this is understood. I would not recommend anybody eating them or playing with them because they can give you a little nip occasionally. Their destructive nature is evident when plumeria trees became infested with caterpillars and as little as one week the tree is stripped of its leaves, seedpods, and flowers. And at the end of it all, they turn into very large, very unattractive brown moths which invade your house at night.

You have three options to deal with these caterpillars. You can:

  1. Do nothing. After the caterpillars have defoliated them, the plumeria plants will recover and produce new leaves again.
  2. Remove the caterpillars from the plants and destroy them.
  3. Spray the plants with an insecticide. You can use a systemic insecticide such as Perfekthion®. This insecticide penetrates the leaves so that when the caterpillars feed on them they will be killed. If you want to use an organic insecticide, use NewBt® or Dipel Pro®. If spraying the organic insecticides, it was best to do so in the late evening, after 4:30 p.m., because the insects were sensitive to ultraviolet light. The caterpillars die two to three hours after feeding on the treated leaves. 

About Nutrients

About Nutrients

Sixteen chemical elements are known to be important to a plant’s growth and survival. The sixteen chemical elements are divided into two main groups: non-mineral and mineral.  

Non-Mineral Nutrients

  • The Non-Mineral Nutrients are hydrogen (H), oxygen (O), & carbon (C).
  • These nutrients are found in the air and water. 
  • In a process called photosynthesis, plants use energy from the sun to change carbon dioxide (CO2 – carbon, and oxygen) and water (H2O- hydrogen and oxygen) into starches and sugars. These starches and sugars are the plant’s food. 
  • Photosynthesis means “making things with light”.
  • Since plants get carbon, hydrogen, and oxygen from the air and water, there is little farmers and gardeners can do to control how much of these nutrients a plant can use.

Mineral Nutrients

The 13 mineral nutrients, which come from the soil, are dissolved in water and absorbed through a plant’s roots. There are not always enough of these nutrients in the soil for a plant to grow healthy. This is why many plumeria growers and gardeners use fertilizers to add nutrients to the soil. The mineral nutrients are divided into two groups:
macronutrients and micronutrients.  

Macronutrients 

Macronutrients can be broken into two more groups: primary and secondary nutrients. 

The primary nutrients are nitrogen (N), phosphorus (P), and potassium (K). These major nutrients usually are lacking from the soil first because plants use large amounts for their growth and survival.

The secondary nutrients are calcium (Ca), magnesium (Mg), and sulfur (S). There are usually enough of these nutrients in the soil so fertilization is not always needed. Also, large amounts of Calcium and Magnesium are added when lime is applied to acidic soils. Sulfur is usually found in sufficient amounts from the slow decomposition of soil organic matter, an important reason for not throwing out grass clippings and leaves.

Micronutrients

Micronutrients are those elements essential for plant growth which are needed in only very small (micro) quantities . These elements are sometimes called minor elements or trace elements, but use of the term micronutrient is encouraged by the American Society of Agronomy and the Soil Science Society of America. The micronutrients are boron (B), copper (Cu), iron (Fe), chloride (Cl), manganese (Mn), molybdenum (Mo) and zinc (Zn). Recycling organic matter such as grass clippings and tree leaves is an excellent way of providing micronutrients (as well as macronutrients) to growing plants.

Soil

In general, most plants grow by absorbing nutrients from the soil. Their ability to do this depends on the nature of the soil. Depending on its location, soil contains some combination of sand, silt, clay, and organic matter. The makeup of soil (soil texture) and its acidity (pH) determine the extent to which nutrients are available to plants.

Soil Texture 

(the amount of sand, silt, clay, and organic matter in the soil)

Soil texture affects how well nutrients and water are retained in the soil. Clays and organic soils hold nutrients and water much better than sandy soils. As water drains from sandy soils, it often carries nutrients along with it. This condition is called leaching. When nutrients leach into the soil, they are not available for plants to use.

An ideal soil contains equivalent portions of sand, silt, clay, and organic matter. Soils across North Carolina vary in their texture and nutrient content, which makes some soils more productive than others. Sometimes, the nutrients that plants need occur naturally in the soil. Other times, they must be added to the soil as lime or fertilizer.

Soil pH

(a measure of the acidity or alkalinity of the soil) Soil pH is one of the most important soil properties that affect the availability of nutrients.

  • Macronutrients tend to be less available in soils with low pH.
  • Micronutrients tend to be less available in soils with high pH.

Lime – can be added to the soil to make it less sour (acid) and also supplies calcium and magnesium for plants to use. Lime also raises the pH to the desired range of 6.0 to 6.5.

In this pH range, nutrients are more readily available to plants, and microbial populations in the soil increase. Microbes convert nitrogen and sulfur to forms that plants can use. Lime also enhances the physical properties of the soil that promote water and air movement.

It is a good idea to have your soil tested. If you do, you will get a report that explains how much lime and fertilizer your crop needs.

Macronutrients

Nitrogen (N)

  • Nitrogen is a part of all living cells and is a necessary part of all proteins, enzymes, and metabolic processes involved in the synthesis and transfer of energy.
  • Nitrogen is a part of chlorophyll, the green pigment of the plant that is responsible for photosynthesis. 
  • Helps plants with rapid growth, increasing seed and fruit production and improving the quality of leaf and forage crops. 
  • Nitrogen often comes from fertilizer application and from the air (legumes get their N from the atmosphere, water or rainfall contributes very little nitrogen)

Phosphorus (P)

  • Like nitrogen, phosphorus (P) is an essential part of the process of photosynthesis. 
  • Involved in the formation of all oils, sugars, starches, etc.
  • Helps with the transformation of solar energy into chemical energy; proper plant maturation; withstanding stress.
  • Effects rapid growth.
  • Encourages blooming and root growth.
  • Phosphorus often comes from fertilizer, bone meal, and superphosphate. 

Potassium (K)

  • Potassium is absorbed by plants in larger amounts than any other mineral element except nitrogen and, in some cases, calcium. 
  • Helps in the building of protein, photosynthesis, fruit quality, and reduction of diseases.
  • Potassium is supplied to plants by soil minerals, organic materials, and fertilizer.

Calcium (Ca)

  • Calcium, an essential part of plant cell wall structure, provides for normal transport and retention of other elements as well as strength in the plant. It is also thought to counteract the effect of alkali salts and organic acids within a plant. 
  • Sources of calcium are dolomitic lime, gypsum, and superphosphate.

Magnesium (Mg)

  • Magnesium is part of the chlorophyll in all green plants and is essential for photosynthesis. It also helps activate many plant enzymes needed for growth.
  • Soil minerals, organic material, fertilizers, and dolomitic limestone are sources of magnesium for plants.

Sulfur (S)

  • Essential plant food for the production of protein.
  • Promotes activity and development of enzymes and vitamins.
  • Helps in chlorophyll formation.
  • Improves root growth and seed production.
  • Helps with vigorous plant growth and resistance to cold.
  • Sulfur may be supplied to the soil from rainwater. It is also added in some fertilizers as an impurity, especially the lower grade fertilizers. The use of gypsum also increases soil sulfur levels. 

Micronutrients

Boron (B)

  • Helps in the use of nutrients and regulates other nutrients. 
  • Aids production of sugar and carbohydrates. 
  • Essential for seed and fruit development. 
  • Sources of boron are organic matter and borax

Copper (Cu)

  • Important for reproductive growth.
  • Aids in root metabolism and helps in the utilization of proteins. 

Chloride (Cl)

  • Aids plant metabolism. 
  • Chloride is found in the soil. 

Iron (Fe)

  • Essential for formation of chlorophyll.
  • Sources of iron are soil, iron sulfate, iron chelate.

Manganese (Mn)

  • Functions with enzyme systems are involved in the breakdown of carbohydrates, and nitrogen metabolism. 
  • Soil is a source of manganese.

Molybdenum (Mo)

  • Helps in the use of nitrogen
  • Soil is a source of molybdenum. 

Zinc (Zn)

  • Essential for the transformation of carbohydrates.
  • Regulates consumption of sugars.
  • Part of the enzyme systems which regulate plant growth. 
  • Sources of zinc are soil, zinc oxide, zinc sulfate, zinc chelate.

Nitrogen deficiency guide

Nitrogen deficiency guide

Nitrogen is one of the important elements a plant needs. It is an important part of proteins, chlorophyll, vitamins, hormones and DNA. Because it is a component of enzymes, nitrogen is involved in all enzyme reactions and plays an active role in the plant’s metabolism. Nitrogen is mainly absorbed by the plant in the form of nitrate and ammonium. It can also be absorbed via small organic molecules.

It is important that the balance between nitrate and ammonium is correct in the feeding otherwise the pH in the rhizosphere (environment immediately surrounding the roots) will become too high or too low. Plants with nitrate as their source of nitrogen have a higher organic acid content. This has an influence on the taste and storage life of the harvest among other things.

Nitrate is converted into ammonium in the plant by the nitroreductase enzyme. Ammonium is then assimilated into organic molecules. Nitrogen has a positive influence on the plant’s growth. The plant gets bigger leaves, more branches and the vegetative period is extended.

About nitrogen in short

What is it and what does it do?
Nitrogen is a component of enzymes and is therefore involved in all enzyme reactions and plays an active role in the plant’s metabolism.
What can you see?
Purple stalks.
Yellowing leaves.
Leaves fall of.
What can you do?
Raise EC of the feeding or add extra nitrogen.

infocourier-nitro_text_4.jpg

Symptoms of a deficiency

Stalks will turn purple, quickly followed by larger leaves in the middle and top parts of the plant, leaves will turn more yellow and finally the leaves whither and fall off.

Development of a deficiency

  • The plant is a lighter color as a whole.
  • Larger leaves in the lower part of the plant turn light green. The leaf stalks of the smaller leaves now also turn purple. Typical vertical purple stripes appear in the stem.
  • Leaves in the lower part of the plant turn more yellow and then become white.
  • The growth is visibly inhibited giving shorter plants, thinner stems, less leaf formation and smaller leaves.
  • Further yellowing and whitening occurs in the top and middle parts of the plant.
  • Leaves on growing points remain green longer but they are a lot less green than at normal nitrogen levels.
  • Forced flowering starts and there is substantial leaf loss. Substantial reduction in yield.

infocourier-nitro_text_3.jpg

Reasons for a deficiency

Deficiency can be caused by incorrect feeding or giving feeding that contains insufficient nutrient elements. Substrates that contain a lot of fresh organic material can cause nitrogen deficiency because micro-organisms bind the nitrogen. A lot of nitrogen can be bound, particularly in the first weeks; this is released later but it is generally too late.

Solutions to resolve a deficiency

Raise the EC of the feeding and rinse the substrate well with it.

  • Add nitrogen yourself to the feeding solution by using urea, blood meal, semi-liquid manure or by using a special “mono-nutrient’ product.
  • Spray the underside of the leaves with a nitrogen solution. This can best be done at the end of the day, just before the lights are turned off. Be careful not to cause burning.

Mildew

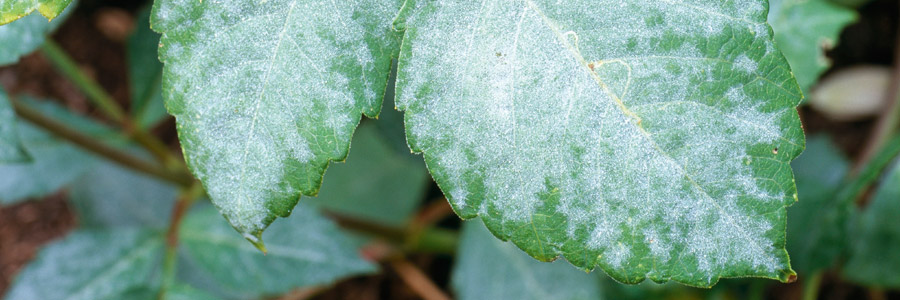
Mildew is also known as ‘downy mildew’ and as the disease spreads, the leaves curl up, necrotize and eventually fall off. The parts of the mycelium that contain the spores of the fungus emerge through the stomata of the plant. In good light it can readily be identified by the gray or purple felt like covering on the back of the leaves.

About mildew

  • What is mildew?
  • The term mildew refers to a group of phytopathogenic fungi that causes diseases in plants.
  • What can you see?
  • In general, mildew is found on the upper side of the leaf, but there are exceptions. One type of mildew only grows on the underside of the leaf. The leaf looks as if it has been dusted with powder.
  • What can you do?
  • Keep humidity low and keep your growing area clean.

About powdery mildew

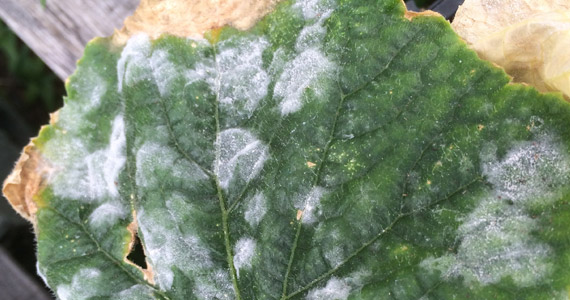
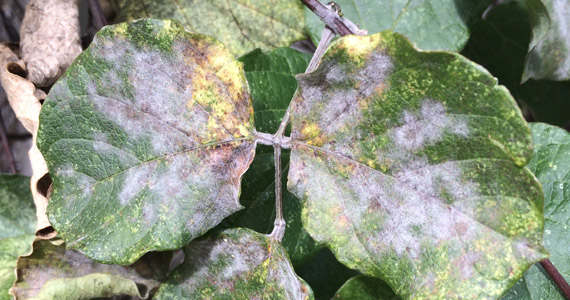
Powdery mildew is also known as Oidium. Before any symptoms become visible the leaf starts to develop blister-like patches, which is followed by the characteristic white powder where the blister was. The leaf looks as if it has been dusted with powder. In general, mildew is found on the upper side of the leaf, but there are exceptions. One type of mildew only grows on the underside of the leaf, so it’s no surprise that this often gets overlooked. However, as the disease advances, the leaves can end up being completely covered in this white layer and it can even colonize the fruits, with subsequent losses in crop size and quality.

How to prevent the disease?

The best treatment against these types of fungi is prevention; once they have set in and developed, they are very difficult to eradicate, sometimes even with chemical fungicides. Try to prevent spores coming in from elsewhere and contaminating your plants by keeping your growing area clean. You can do this by using only clean equipment and washing your hands thoroughly before entering.

articles-pests-diseases-mildew_text_2

Identification

How To Identify Powdery Mildew Damage

  • Plants infected with powdery mildew look as if they have been dusted with flour.
  • Powdery mildew usually starts off as circular, powdery white spots, which can appear on leaves, stems, and sometimes fruit.
  • Powdery mildew usually covers the upper part of the leaves and affects the older leaves first; the leaves turn yellow and dry out.
  • The fungus might cause some leaves to twist, break, or become distorted.
  • The white spots of powdery mildew will spread to cover most of the leaves or affected areas.
  • The leaves, buds, and growing tips will become distorted as well. These symptoms usually appear late in the growing season. 

Control and Prevention

How To Control Powdery Mildew 

  • Rubbing the infected leaves together can help partially remove the disease from your plants.
  • Remove all the infected plant parts and destroy them. Remember, do not compost any infected plant, as the disease can still be spread by the wind.
  • Spray infected plants with fungicides. Effective fungicides for powdery mildew treatments or cures include sulfur, lime-sulfur, neem oil, and potassium bicarbonate.

How To Prevent Powdery Mildew

  • Choose plants that are resistant or tolerant to powdery mildew.
  • Powdery mildew thrives in hot and humid weather, so avoid overhead watering to reduce humidity. Also selectively prune overcrowded areas to increase air circulation; this also helps reduce humidity for your plants.
  • Spray your plants with fungicides according to their directions. If you don’t want to use fungicides, try spraying your plants with a solution of 1 teaspoon baking soda in 1 quart of water. Remember to spray your plants thoroughly.

Plumeria that grow in crowded, humid or shaded conditions are susceptible to powdery mildew, a form of mold. Powdery mildew is a common fungal disease that affects many types of plants, from squash to plumerias. The signature symptom of powdery mildew is white or gray powdery spots on the upper sides of plumeria leaves. The spots sometimes appears on flowers, buds, the undersides of leaves and new shoots. As the infection progresses, the leaves turn yellow, become distorted and drop off prematurely, and flower buds fail to open. The fungus overwinters in brown or black fruiting bodies.

Plumeria Rust

Rust Fungus is caused by Coleosporium dominguense and Coleosporium plumeriae 

In general, however and given rust is rather specific in its host range.  Many rust have several kinds of microscopic spores.

The plumeria cultivars most susceptible to this fungus are the Plumeria rubra types and the Plumeria obtusa. This fungus manifests itself as red-orange pustules on the backsides of leaves. It presence can always be determined be the appearance of yellow, orange or reddish-brown powdery pustules on the leaves, stems, or buds of the infected plant. The spores produced in these pustules are carried by splashing rain or air currents to near-by healthy plants where new infections will occur. Your first line of attack should be to cut off affected leaves. Do not add them to a compost pile because the disease can spread. The Plumeria Society of America recommends using a broad spectrum fungicide—those products containing bayleton, benomyl or oxycarboxin are appropriate. Cutting down tall weeds around plumeria trees helps to improve air circulation and will reduce the humidity this pathogen needs to survive. Also, when you plant plumeria trees, be sure to leave plenty of space between trees.

Rust Fungus does not kill Plumeria, but can rapidly de-foliate an entire tree.

Most plumeria cultivars grown are susceptible to the pathogen and have numerous powdery spore masses on the underside of leaves. Leaves can turn brown and fall from the plant as early as two months after the springtime flush of new leaves is infected by the fungus.

How to Control Rust Fungus

  • Keep the growing area clean and free of fallen leaves.
  • Carefully remove and place infected leaves into trash bags.
  • Mild outbreaks can be controlled by fungicides such as GreenLight “Fung-Away” spray.
  • The only proven chemical to control rust is products containing Bayleton. Bayer Bayleton 50 fungicide and Strike 50 are two products know to help control rust.
  • To best control rust, you will need to setup a regular  regiment and treat the entire infected area. 
Rust fungus will over-winter on infected plants.   


Additional Ideas for Controlling Rust Fungus

Plumeria trees in sunny, well-ventilated locations are less susceptible to mold infections. Fungicides, including mycobutanil, control plumeria rust, according to the University of Hawaii at Manoa Cooperative Extension. Dispose of fallen rust-infected leaves, and spray the ground under the tree in the winter. Apply copper fungicide, neem oil or horticultural oils during early stages of powdery mildew infection, and remove any diseased leaves and stems. To prevent sooty mold, inspect stems and the undersides of leaves for insects, and remove the insects by hand or with insecticidal soap or a forceful stream of water. Carefully follow pesticide label directions and precautions.

Additional reading form University of Hawaii  pd-61-1

Sooty Mold

Sooty mold is actually a symptom of an aphid, whitefly or thrip infestation. These tiny insects feed on plumeria leaf and stem juices and secrete a sticky, sugary liquid called honeydew. Clusters of the insects may be visible on the undersides of infested leaves. Black sooty mold grows in the honeydew on plumeria leaves and stems. The mold can interfere with photosynthesis as it coats the leaves, and can cause stunted growth and reduced plant vigor.

Control

Plumeria trees in sunny, well-ventilated locations are less susceptible to mold infections. Fungicides, including mycobutanil, control plumeria rust, according to the University of Hawaii at Manoa Cooperative Extension. Dispose of fallen rust-infected leaves, and spray the ground under the tree in the winter. Apply copper fungicide, neem oil or horticultural oils during early stages of powdery mildew infection, and remove any diseased leaves and stems. To prevent sooty mold, inspect stems and the undersides of leaves for insects, and remove the insects by hand or with insecticidal soap or a forceful stream of water. Carefully follow pesticide label directions and precautions.

Plumeria – Frangipani Mosaic Virus

(FMV) Virus-causing color break in Plumerias

Based upon visual observation of infected plumeria plants from various places for a number of years, it seems that Frangipani Mosaic Virus (FMV) has a minimal effect on the growth and the health of most plumerias with the exception of severe cases in a few cultivars. Its symptoms may include, e.g., leaf malformation, mottled leaf, and/or splash or color break (CB), especially on the petals. Some plumeria trees appear normal with only an occasional CB on the petals, which is attractive to some people.

From my point of view, however, the color break is unacceptable since it distorts the original colors of flowers. In addition, unlike other diseases, it is incurable, and the virus that resides in the infected plant may accidentally spread to other plumeria trees somehow, and finally, the whole collection may all be infected.

According to ICTVdb, the FMV transmitted by mechanical inoculation not involving a vector. 

Suggested reading related to Frangipani Mosaic Virus: click…DPVWeb or 
https://www.ncbi.nlm.nih.gov/pubmed/26239043

Characterization and diagnosis of frangipani mosaic virus from India.

Author(s) : Alok KumarVikas SolankiVerma, H. N.Bikash Mandal

Author Affiliation: Advanced Centre for Plant Virology, Division of Plant Pathology, Indian Agricultural Research Institute, New Delhi, 110 012, India.

Author Email: leafcurl@rediffmail.com

Journal article: Virus Genes 2015 Vol.51 No.2 pp.310-314 ref.14

Abstract: Frangipani mosaic virus (FrMV) is known to infect frangipani tree (Plumeria rubra f. acutifolia) in India but the virus has not been characterized at the genomic level and diagnosis is not available. In the present study, an isolate of FrMV (FrMV-Ind-1) showing greenish mosaic and vein-banding symptoms in P. rubra f. acutifolia in New Delhi was characterized based on host reactions, serology, and genome sequence. The virus isolate induced local symptoms on several new experimental host species: Capsicum annuum(chilli), Nicotiana benthamiana, Solanum lycopersicum and S. melongena. N. benthamianacould be used as an efficient propagation host as it developed systemic mottle mosaic symptoms all around the year. The genome of FrMV-Ind-1 was 6643 (JN555602) nucleotides long with genome organization similar to tobamoviruses. The Indian isolate of FrMV shared a very close genome sequence identity (98.3%) with the lone isolate of FrMV-P from Australia. FrMV-Ind-1 together with FrMV-P formed a new phylogenetic group i.e. Apocynaceae-infecting tobamovirus. The polyclonal antiserum generated through the purified virus preparation was successfully utilized to detect the virus in field samples of frangipani by ELISA. Of the eight different tobamoviruses tested, FrMV-Ind-1 shared distant serological relationships with only cucumber green mottle mosaic virus, tobacco mosaic virus, bell pepper mottle virus, and kyuri green mottle mosaic virus. RT-PCR based on coat protein gene primer successfully detected the virus in frangipani plants. This study is the first comprehensive description of FrMV occurring in India.

ISSN: 0920-8569

DOI: 10.1007/s11262-015-1228-3

URL: http://link.springer.com/article/10.1…

Record Number: 20153349035

Publisher: Springer

Location of publication: Dordrecht

Country of publication: Netherlands

Language of text: English

Language of summary: English

How to Avoid FMV Virus in Plumerias

Note: There is no effective treatment for FMV transmitted by mechanical inoculation not involving a vector.

Viral-contaminated cutting tools used in grafting and pruning are likely the most common means of FMV transmission. Unfortunately, it is how this particular virus spreads rapidly and covertly in plumerias, especially in Thailand

Nowadays, symptoms are commonly seen in plumerias which are sold in the markets everywhere. Some virused plumerias may look normal, but the symptoms generally appear in a later stage. Thus it is important to address this issue to increase growers’ awareness, to keep the virus under control, and to save all great plumeria cultivars from being infected. 

Follow these Practices to prevent the spread of FMV

1. In an attempt to keep the whole plumeria collection virus-free, newly acquired plumerias should be isolated over a period of time to observe or check (test) for the presence of the virus.

2.  All FMV-infected plants should be separated from the rest of the collection and/or destroyed.

3.  Using a sterilized cutting tool is also the key to preventing the spread of the FMV, which may be present in the plumeria trees growing in the garden, to the rest of the collection.

4.  My routine practice of pruning plumerias in the garden is to carry as many sterilized knives as possible with me and use only one knife per plumeria plant. They are then sterilized in boiling water for further use.

5. Plumerias with the virus should not be allowed to be registered as a new cultivar based upon the appearance of the flowers with the color break. It is just a diseased plant, not an innovative one.

Stem Rot

Stem Rot is a disease that causes the decaying of the inner layers of the Plumeria. The plumeria stem becomes soft and squishy as the inside rots away.  Stem rot moves very quickly and is almost always fatal to cuttings. Stem Rot usually occurs while trying to root cuttings or during winter storage.

Cool temperatures and wet soil contribute to Stem Rot.  Rooting cuttings and newly rooted plumerias are at highest risk for developing stem rot.

Stem rot officially is a disease caused by a fungus infection in the stem. Fungus that causes stem rot are Rhizoctonia, Fusarium and Pythium. Stem rot can readily infect crops that are in their vegetative or flowering stages. The disease can survive up to five years in the soil. Symptoms of stem rot includes staining of infected area, reduced crop yield and crop failure.

  • The disease can be spread through the use of unfiltered water as well as unsterilized tools.
  • Also leaving previous dead roots in soil can increase the risk of stem rot. Spores can also enter the plant through injured stem tissue on the plant including from insect attacks. The fungus impedes stem functions like transporting nutrients. It can cause water to leak through the lesions of stem tissue.
  • An issue with maintaining this disease is the lack of management by crop producers. Producers of plumeria tend to not manage for the disease because it normally results in the loosing of the affected cuttings or newly rooting plants.
  • Fungicides can be used to manage the disease as well as burning the crop after harvest or letting it decompose.

What it does

Stem rot leads to formation of lesions and production of chalky grains and unfilled panicles.

Why and where it occurs

The infection bodies or sclerotia are found in the upper soil layer. They survive in air-dry soil, buried in moist soil, and in tap water. They can also survive on straw, which is buried in the soil. 

Infection is high on plants with wounds as a result of taking cutting with infected tools or rooting cuttings with infected soil. The panicle moisture content and nitrogen fertilizer also influence disease development.

How to identify?

Check the plant for the following symptoms:

Infected stem rots

  • visible numerous tiny white and black sclerotia and mycelium inside the infected culms
  • infected culm lodges and caused unfilled panicles and chalky grain
  • The stem becomes soft or mushy.
  • Initial symptoms are small, irregular black lesions on the outer leaf sheath near water level. Lesions expand as the disease advances.

Why is it important?

The infection is seen on the rice crop during early heading and grain filling. The leaf sheaths decay and cause lodging and lower grain filling. It can cause heavy losses in many countries.

For example, in Japan, there are 51,000−122,000 hectares infected and estimated annual losses of 16,000−35,000 due to this disease. In Vietnam, the Philippines, and India, losses from 30% to 80% were recorded.

How to manage?

  • Burn straw and stubble or any crop residue after harvest or let the straw decompose.
  • Drain the field to reduce sclerotia.
  • Balance the use of fertilizer or perform split application with high potash and lime to increase soil pH.
  • Chemicals such as fentin hydroxide sprayed at the mid-tillering stage, thiophanate-methyl sprayed at the time of disease initiation can reduce stem rot incidence in the rice field.
  • Other fungicides such as Ferimzone and validamycin A also show effectivity against the fungus.
  • Do not reuse soil know to to have had infected plants.
  • Root only in fresh sterilized soil.

Once a Plumeria has survived it’s first winter, Stem Rot is usually not a problem.

Plumeria Cuttings:  Infected cuttings typically fail to root. Instead they develop rot that gradually moves up the stem. Leaf wilt and leaf spotting may be evident. The rotted stem eventually becomes shriveled, turns dull dark brown to black in color, and falls over in its pot.

Mature Plumerias:  Although rare,  mature plants can lose a branch or two from stem rot and/or freeze damage.  Freeze damage looks almost the same as Stem Rot.  In either case, with mature plumeria just cut off the affected areas and a mature plumeria will bounce right back with new branches and leaves.