Perlite vs Vermiculite

Perlite and vermiculite are both used to improve moisture retention and aeration in soil. They are used in a similar manner, but they are not interchangeable. Perlite and vermiculite are quite different in composition and in how they improve your soil. Determining which is better for use in your garden depends on your plants and their needs.

Composition

Vermiculite is an aluminum-iron-magnesium silicate that resembles mica in appearance. For use in horticultural applications, vermiculite is heated to expand the particles. This expansion enables it to absorb moisture when used as a potting medium. Vermiculite can soak up 3 to 4 times its volume in water. It also attracts plant nutrients such as potassium, magnesium, calcium and phosphorus. Perlite is an amorphous volcanic rock that is rich in silicon. When mined for use as a potting medium, perlite is crushed and also heated to expand the particles. The microscopic bubbles in perlite granules absorb and hold water as well, but they also hold air.

Description

Vermiculite is a spongy material that is dark brown to golden brown in color. It is shaped like flakes when dry. Perlite is a porous pumice-like material that looks like white granules. Sometimes perlite is mistaken for tiny plastic foam balls when used in potting soil mixtures.

Water Retention

Perlite and vermiculite are both good at retaining water, but vermiculite acts more like a sponge, holding much more water than perlite and offering less aeration for the plant roots. Perlite retains water because of its large surface area with nooks and crannies available for water storage. Because it is porous it allows excess water to drain more readily than vermiculite and improves soil aeration.

Horticultural Uses

Both vermiculite and perlite are used in the garden to prevent soil compaction, improve aeration and retain moisture. They’re also used in propagation of new plants and seed cultivation, as well as in indoor container growing, composting and on lawns. However, the way that each material retains water, and how much water is retained, makes each one suitable for different plants. Vermiculite is ideal for plants that prefer lots of water, such as forget-me-nots and some irises. Perlite would dry out too rapidly for water-loving plants. However, the amount of water vermiculite holds is not ideal for plants such as cacti or rhododendrons, which need a well-drained soil. The moisture retained by vermiculite would lead to root rots or plant death.

Perlite vs Vermiculite: What’s the Difference?

The difference between perlite vs vermiculite is important to know for the prosperity of your garden. They seem very similar, but differ in a few crucial ways.

What is Perlite?
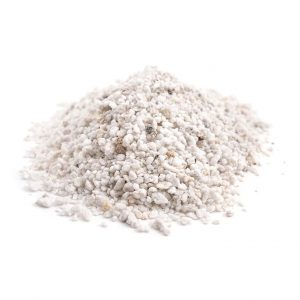
perlite-min_768x768

Perlite

Perlite is lightweight, easy to handle, clean and has no odor. It has a pH of 6.6 to 7.5.

The life of a bag of perlite begins as volcanic glass — but not any type of volcanic glass. It’s formed when obsidian contacts water, creating a unique type of volcanic glass with a high water content. When manufacturers apply heat to perlite, it puffs up into little white balls. Often times they’ll mix these little white balls — what we call perlite — into potting soils to aid with soil aeration and water retention. It retains some water but also air on the surface of the little balls in all the hidden nooks and crannies.

Perlite is a good choice when you have plants in your garden that require soil to dry out completely between watering. For example, if you’re growing a cactus or a succulent, perlite is a great addition to the soil.

Because it’s so porous, perlite does allow excess water to drain quickly…sometimes all over your porch. It has a tendency to easily crush into a powder between your fingers, but this usually isn’t a problem because it doesn’t encounter that type of pressure in your pots or beds. It’s chief use is to improve soil aeration, lightening the soil and giving better drainage and oxygen access for your plants’ roots.

What is Vermiculite?
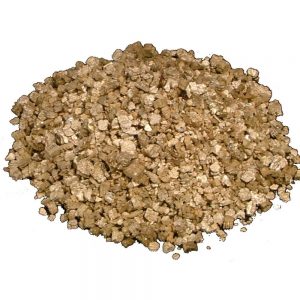
virmiculate

Vermiculite

Vermiculite interacts with potassium, calcium and magnesium in your soil. It also helps to raise the pH slightly of your plants even though it’s a neutral pH of 7.0.

Vermiculite is made from compressed dry flakes of a silicate material which is absorptive and spongy. The color of vermiculite is a golden brown to a dark brown and is a sometimes difficult to tell from the potting soil it’s mixed with. When water is added to vermiculite, the flakes expand into a worm-like shape and act like an absorbing sponge. If you want to poke these “vermiculite worms” with your fingers, you’re not alone — that’s what I wanted to do when I first saw them too!

Vermiculite is best used for plants that require soil to stay damp and not dry out. For plants that love water, using vermiculite or mixing a healthy scoop of it into your potting soil is the way to go. It can absorb 3 to 4 times its volume when water is added, making your pots a little bit on the heavy side.

Since vermiculite acts like a sponge and absorbs more water than perlite, it doesn’t aerate the soil as well. This means less oxygen for plant roots. If you use it when growing plants that don’t need damp soil, you might find your plants suffering from root rot. So be aware of your plants’ needs when you decide how water retentive you want your soil to be.

More Differences Between Vermiculite and Perlite

There are major differences between vermiculite and perlite, making it important to choose the right one, lest your garden be ruined by a bad growing media choice.

We’ve already covered the biggest difference: Vermiculite will mix with soil and help to retain water. Perlite, on the other hand, will add drainage to the soil that it’s mixed with.

Vermiculite finds its way into many seed starting systems. It both protects seedlings from fungus that so often ruins seed starting, and helps to retain water in the tiny little pods that seeds start in. While perlite can be used with seedlings, it’s better used when you move your seedlings into separate pots for additional drainage.

Which To Use In Your Garden?

There’s a large discussion in the gardening community on which to use in the garden. Here’s the truth: it’s a false debate. They both have their own purposes in the garden.

Use Perlite If…

  1. You have plants that need to dry out before watering again
  2. When you move your seedlings to separate pots
  3. You need to loosen clay soil in your garden

Perlite when added to clay soils, it can eliminate both surface crusting and puddles. It will also help to reduce fluctuations in soil temperatures in your garden soil. Perlite will also improve both drainage and aeration in your home gardens. Horticultural perlite can be bought in different grades according to how you’re going to use it. For general application, a fine to medium grade can be used. It’s free of weeds, disease free and sterile.

Use Vermiculite If…

  1. You need an additive for plants that need to be kept moist
  2. You want your seed trays to develop strong seedlings

Vermiculite is odorless, can be purchased in horticultural-grade bags with directions on working it into the garden soil. It’s a permanent soil conditioner and won’t break down in your soil like compost does. When it is watered or it rains, the vermiculite will hold water in the soil until the soil begins to dry out and releases it. Vermiculite can be used in potted containers, on lawns and for composting. It can be used in mycology for mushrooms added to the substrate.  It can improve the soil that needs an additive to retain water for your plants which need it.

In summary: Both are good additives to your gardening needs, you just need to know what you’re using them for!
Fertilizer Basics

Fertilizer Nutrients

Plumeria need to be fertilized because most soil does not provide the essential nutrients required for optimum growth. Even if you are lucky enough to start with great garden soil, as your plants grow, they absorb nutrients and leave the soil less fertile. Remember those beautiful blooms and leaves you grew last year? It took nutrients from the soil to build those plant tissues. By fertilizing your plumeria, you replenish lost nutrients and ensure that this year’s plumeria have the food they need to flourish.

There are six primary nutrients that plants require. Plants get the first three—carbon, hydrogen and oxygen—from air and water. The other three are nitrogen, phosphorus and potassium.

Nitrogen helps plumeria make the proteins they need to produce new tissues. In nature, nitrogen is often in short supply so plumeria have evolved to take up as much nitrogen as possible, even if it means not taking up other necessary elements. If too much nitrogen is available, the plumeria may grow abundant foliage but not produce flowers. Growth may actually be stunted because the plumeria isn’t absorbing enough of the other elements it needs.

Phosphorus stimulates root growth, helps the plant set buds and flowers, improves vitality and increases seed size. It does this by helping transfer energy from one part of the plumeria to another. To absorb phosphorus, most plumeria require a soil pH of 6.5 to 6.8. Organic matter and the activity of soil organisms also increase the availability of phosphorus.

There are three additional nutrients that plumeria need, but in much smaller amounts: Potassium improves overall vigor of the plumeria. It helps plumeria make carbohydrates and provides disease resistance. It also helps regulate metabolic activities.

Calcium is used by plumeria in cell membranes, at their growing points and to neutralize toxic materials. In addition, calcium improves soil structure and helps bind organic and inorganic particles together.

Magnesium is the only metallic component of chlorophyll. Without it, plumeria can’t process sunlight.

Sulfur is a component of many proteins.

Finally, there are eight elements that plumeria need in tiny amounts. These are called micronutrients and include boron, copper and iron. Healthy soil that is high in organic matter usually contains adequate amounts of each of these micronutrients.

Organic vs. Synthetic

Do plumeria really care where they get their nutrients? Yes, because organic and synthetic fertilizers provide nutrients in different ways. Organic fertilizers are made from naturally occurring mineral deposits and organic material, such as bone or plant meal or composted manure. Synthetic fertilizers are made by chemically processing raw materials.

In general, the nutrients in organic fertilizers are not water-soluble and are released to the plumeria slowly over a period of months or even years. For this reason, organic fertilizers are best applied in the fall so the nutrients will be available in the spring. These organic fertilizers stimulate beneficial soil microorganisms and improve the structure of the soil. Soil microbes play an important role in converting organic fertilizers into soluble nutrients that can be absorbed by your plumeria. In most cases, organic fertilizers and compost will provide all the secondary and micronutrients your plumeria need.

Synthetic fertilizers are water-soluble and can be taken up by the plumeria almost immediately. In fact applying too much synthetic fertilizer can “burn” foliage and damage your plumeria. Synthetic fertilizers give plumeria a quick boost but do little to improve soil texture, stimulate soil life, or improve your soil’s long-term fertility. Because synthetic fertilizers are highly water-soluble, they can also leach out into streams and ponds. Synthetic fertilizers do have some advantages in early spring. Because they are water-soluble, they are available to plumeria even when the soil is still cold and soil microbes are inactive. For this reason, some organically-based fertilizers, such as PHC All-Purpose Fertilizer, also contain small amounts of synthetic fertilizers to ensure the availability of nutrients.

For the long-term health of your garden, feeding your plumeria by building the soil with organic fertilizers and compost is best. This will give you soil that is rich in organic matter and teeming with microbial life.

Foliar Feeding?

Plumeria can absorb nutrients eight to 20 times more efficiently through their leaf surfaces than through their roots. As a result, spraying foliage with liquid nutrients can produce remarkable yields. For best results, spray plants during their critical growth stages such as transplanting time and blooming time.

What About pH?

Even if proper nutrients are present in the soil, some nutrients cannot be absorbed by plumeria if the soil pH is too high or too low. For most plumeria, soil pH should be between 6.0 and 7.0. A soil test will measure the pH of your soil. You can send a sample to a lab (contact your local extension service for a low-cost kit) or buy a home kit and do it yourself. Lime or wood ash can be used to raise pH; sulfur or aluminum sulfate can lower pH. Keep in mind that it’s best to raise or lower soil pH slowly over the course of a year or two. Dramatic adjustments can result in the opposite extreme, which may be worse than what you started with. Once again, a helpful solution is to apply compost. Compost moderates soil pH and is one of the best ways to maintain the 6.5 ideal.

Slow-release, granular Excalibur 11-11-13 or similar fertilizer gives your plumeria all the nutrients they need, including plenty of phosphorus for big, abundant flowers. For a healthy start, mix a handful into the soil at transplant time and at the beginning of your growing season.

How to Choose a Fertilizer

In most cases, an all-purpose, 11-11-13 fertilizer with micronutrients such as Excalibur will provide the nutrients all plumeria need for healthy growth. If a soil test reveals certain nutrient deficiencies, or if you want to tailor your fertilizer to the needs of particular plumeria, you can select a special formulation. What you choose will depend on your soil and what you are growing.

The three numbers that you see on a fertilizer label, such as 11-11-13, tell you what proportion of each macronutrient the fertilizer contains. The first number is always nitrogen (N), the second is phosphorus (P) and the third is potassium (K). This “N-P-K” ratio reflects the available nutrients —by weight—contained in that fertilizer. For example, if a 100-pound bag of fertilizer has an N-P-K ratio of 11-11-13, it contains 11 pounds of nitrate, 11 pounds of phosphate (which contains phosphorus), 13 pounds of potash (which contains potassium) and 84 pounds of filler.

Note that the N-P-K ratio of organic fertilizers is typically lower than that of a synthetic fertilizer. This is because by law, the ratio can only express nutrients that are immediately available. Most organic fertilizers contain slow-release nutrients that will become available over time. They also contain many trace elements that might not be supplied by synthetic fertilizers.

To build the long-term health and fertility of your soil, we recommend using granular slow release fertilizers with micronutrients. Supplemented with a water-soluble fertilizer ensures that your plants have the nutrients they need when they’re in active growth.

Scales – Pest

Scales

Can be serious pests on all types of woody plants and shrubs. Scales are so unusual looking that many people do not at first recognize them as insects. Adult female scales and many immature forms do not move, are hidden under a disklike or waxy covering, and lack a separate head or other recognizable body parts. Scales have long piercing mouthparts with which they suck juices out of plants. They may occur on twigs, leaves, branches, or fruit. Severe infestations can cause overall decline and even death of plants. Most scales have many natural enemies that often effectively control them.

Woody plants heavily infested with armored scales often look water stressed. Leaves may turn yellow and drop, twigs and limbs on trees may die, and bark may crack and produce gum. Many armored scales attack leaves or fruit as well, leaving blemishes and halos on fruit; the fruit damage is often just aesthetic. Some armored scales can kill plants.

Control

Scales are often well controlled by natural enemies, especially when predator and parasite activities are not disrupted by ants or applications of broad-spectrum insecticides such as carbaryl, malathion, or pyrethroids applied to control other pests. If scale populations, especially armored scale species, become abundant, you should take action. In the case of soft scales, controlling ants may be sufficient to bring about gradual control of scales as natural enemies become more abundant. If not, well-timed sprays of oil applied either during the dormant season or when crawlers are active in spring (or, in the case of black scale, in summer) should provide good control.

Dormant-season applications of specially refined oils, often called narrow-range, supreme, or superior type oils, are effective against most scale pests of deciduous trees and landscape plants, especially San Jose scale, walnut scale, and the lecanium scales, but not against oyster shell or olive scales because susceptible stages of these pests are not present during winter. Avoid oils called dormant oil or dormant oil emulsions, which are more likely to injure plants. Treatments can be made any time during dormancy or, for sycamore scale and oak pit scales, during the delayed dormant period, which is the time after the buds swell but before they open. Be sure that the plants are not water stressed to avoid injury. A good time to apply oils is right after a period of rain or foggy weather.

An application of oil or soap alone is usually adequate. One study (of sycamore scale) found that organophosphates (e.g., malathion) combined with oil were no more effective than a properly timed, thorough application of oil or soap alone.

Avoid using the organophosphates chlorpyrifos (Dursban) and diazinon in landscapes and gardens because of problems from their runoff in urban surface water and contamination of municipal wastewater.

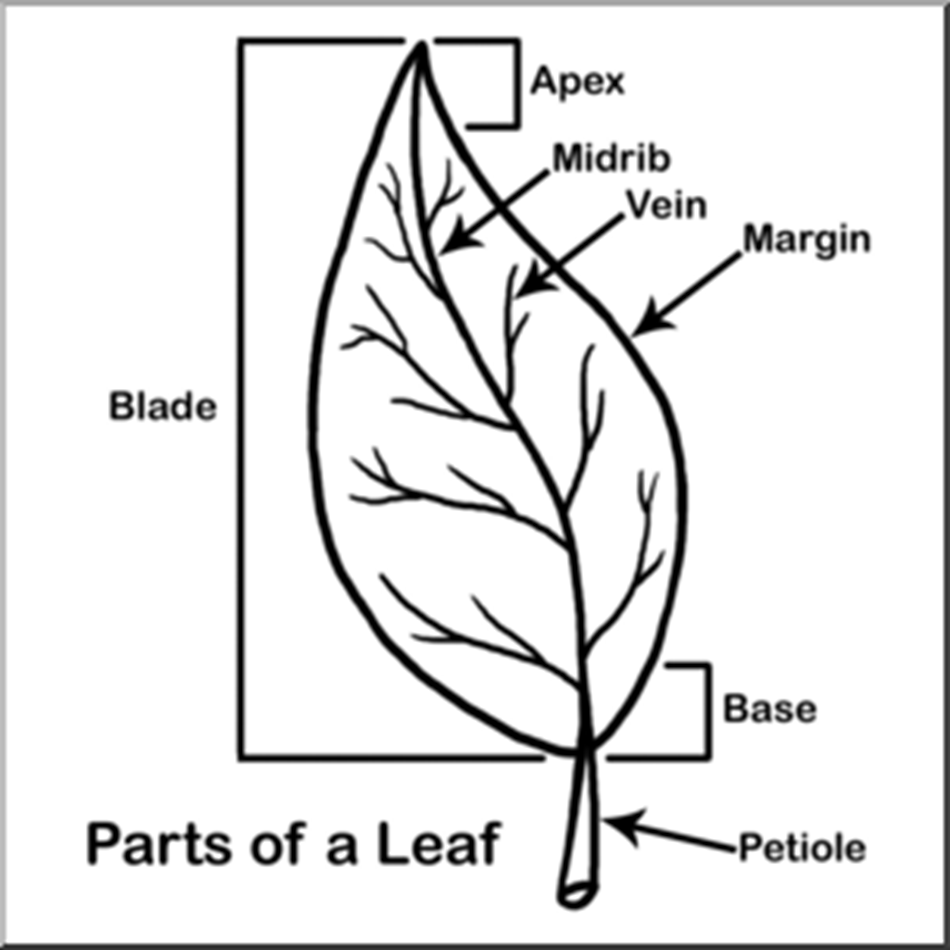
Leaf Shape

Leaves

Leaves functions

Manufacture food through photosynthesis

This is possible due to the green pigment in them called CHLOROPLAST, Leaves are the chief food producing organ in MOST not all plants, and because they create food via photosynthesis they are typically arranged in convenient ways to allow maximum absorption of sunlight.

Gas (air) exchange, Respiration

Leaves use our bi-product carbon dioxide for photo synthesis! This co dependent relationship is required for survival for not only them but for everything here on earth that requires oxygen to live.

Protect vegetative and floral buds

Some plants are unique in terms of how they’ve adapted to protecting themselves by growing their own defenses. Example: the artichoke has grown a protective wall over the entire bud to allow it to safely grow!

Water transport, transpiration

Plants lose a relatively large amount of water through transpiration through their STOMATA, in fact its estimated that the loss of water via stomata through the process of transpiration exceeds over 90 percent of the water absorbed by the roots!

Leaf Shapes

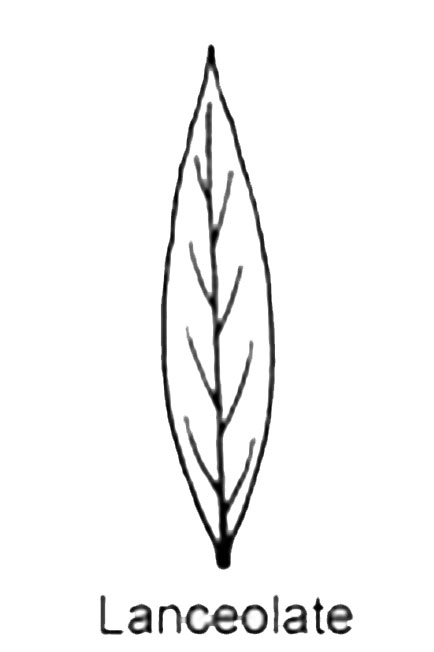
Lanceolate

Lanceolate leaves are significantly longer than wide and widest below the middle, gradually tapering toward the apex. Type 1

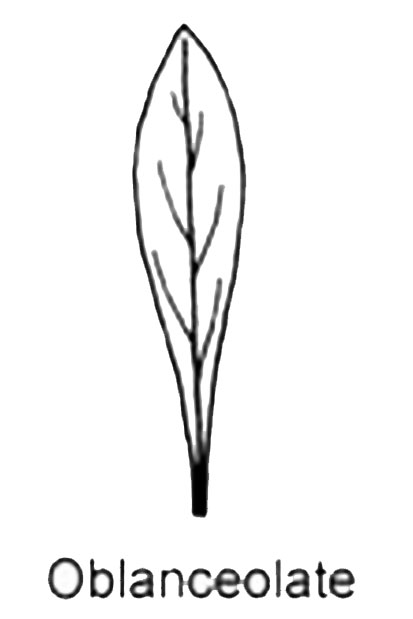
Obanceolate

Obanceolate leaves are significantly longer than wide and widest above the middle, gradually widening toward the apex. Type 2

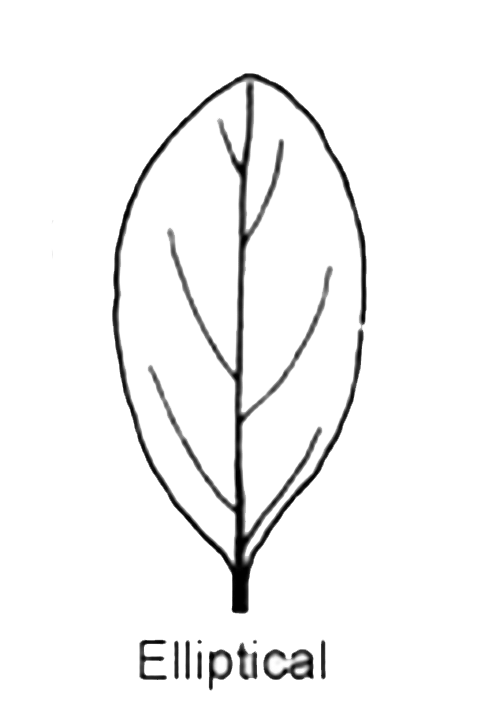
Elliptic

Elliptic leaves are about twice as long as broad. The broadest part is in the middle and the two ends narrow equally. Type 3

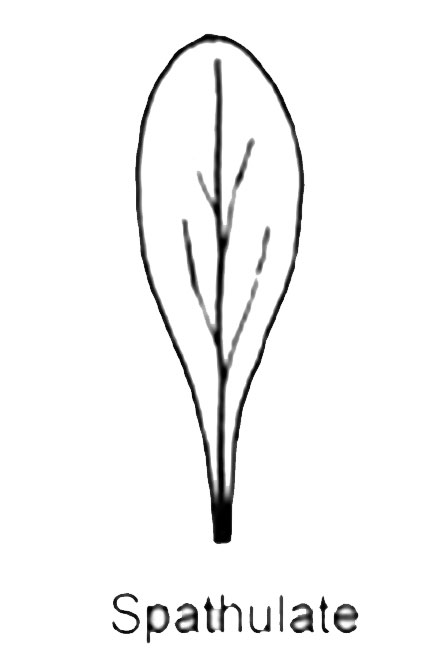
Spatulate

Spatulate leaves are broadly rounded at the apex and gradually curve down toward the base. Type 4

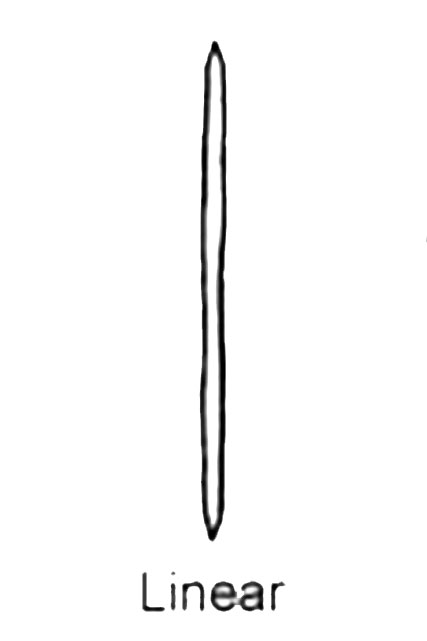
Linear

Linear leaves are more that twelve times longer than wide. They are long and narrow with more or less parallel margins or sides.

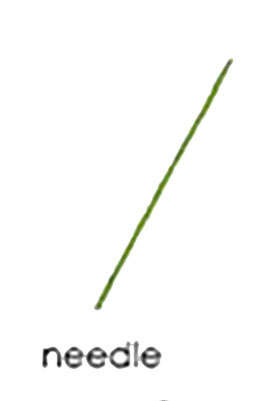
Needlelike

Needlelike leaves are then and long like needles. filifolia is the only Plumeria know to have this type of leaf.

Round

Round leaves are broadly rounded at the apex and the base.

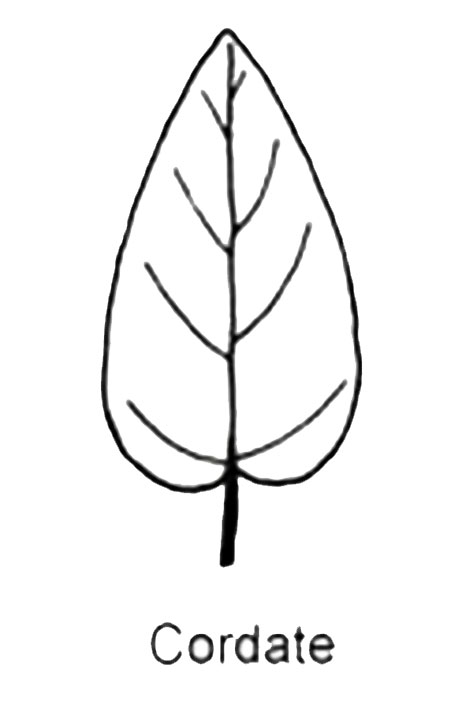
Cordate

Cordate leaves are shaped like hearts. The stem is attached at the wide end of the leaf.

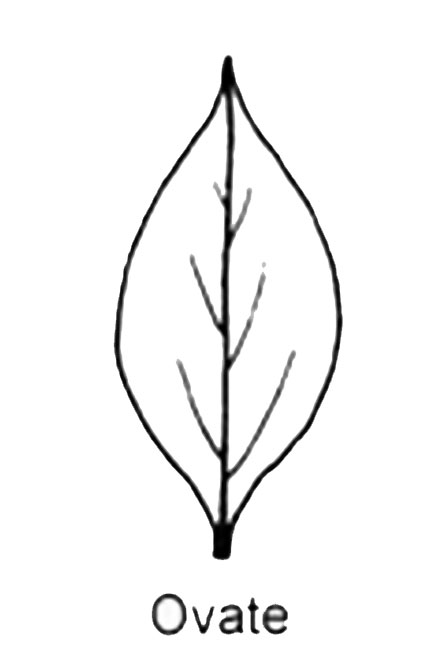
Ovate

Ovate leaves are shaped like an egg, with the broader end of the leaf nearest the petiole.

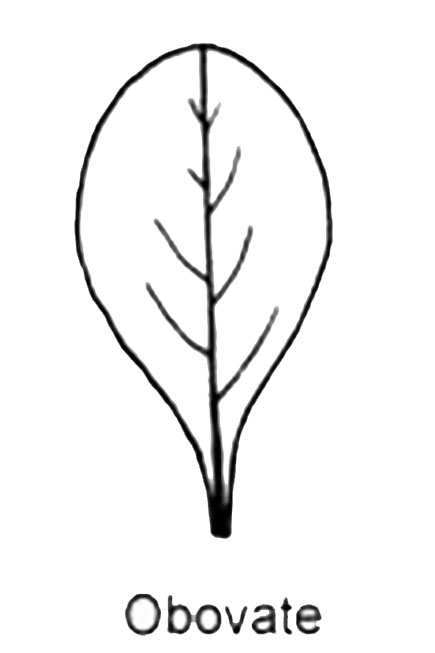
Obovate

Obovate leaves are shaped like an egg, with the broader end of the leaf farthest from the petiole.

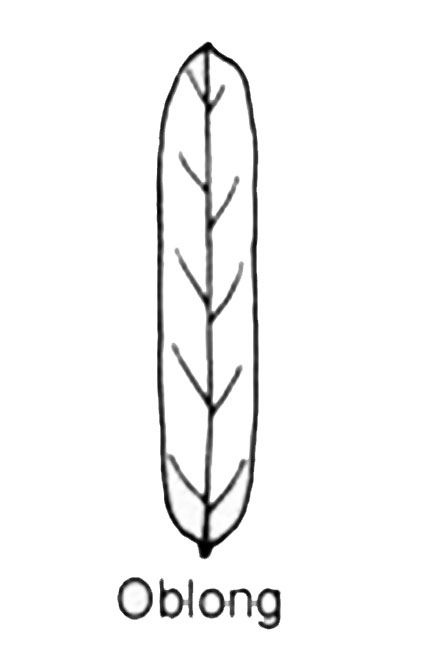
Oblong

Oblong leaves almost resemble a rectangle, except that their corners are rounded. They are at least twice as long as they are wide.

Plumeria Leaf Tip Shapes

Type 1 emerginate

Type 2 obtuse or rounded

Type 3 obtuse or blunt

Type 4 acute

Type 5 acuminate

Leave Structure

Leaves are organs to the plant, they come in many different shapes, sizes, and arrangements all varying on the different conditions each plant must survive in.

An important part of leaves is the role of STOMATA or STOMA. Stoma consist of a pore surrounded by 2 sausage shaped epidermal guard cells. These pores are open and close as they regulate the flow/amount of gases and water to and from the leaves. 

They are typically found on the underside of leaves but in some cases, they are found on other organs of the plant like the stem or fruit.

Legend of definitions


Chloroplast

A plastid that contains chlorophyll and in which photosynthesis takes place

Stomata

Stoma consist of a pore thats surrounded by 2 sausage shaped epidermal guard cells. These pores open and close as they regulate the flow/amount of gases and water to and from the leaves.
Photosynthesis    The process by which green plants and some other organisms use sunlight to synthesize foods from carbon dioxide and water.

Potassium (K)

Potassium is a chemical element with symbol K (derived from Neo-Latin kalium) and atomic number 19. Elemental potassium is a soft silvery-white alkali metal that oxidizes rapidly in air and is very reactive with water, generating sufficient heat to ignite the hydrogen emitted in the reaction and burning with a lilac flame. Naturally occurring potassium is composed of three isotopes, one of which, 40K, is radioactive. Traces (0.012%) of this isotope are found in all potassium making it the most common radioactive element in the human body and in many biological materials, as well as in common building substances such as concrete.


Because potassium and sodium are chemically very similar, their salts were not at first differentiated. The existence of multiple elements in their salts was suspected in 1702, and this was proven in 1807 when potassium and sodium were individually isolated from different salts by electrolysis. Potassium in nature occurs only in ionic salts. As such, it is found dissolved in seawater (which is 0.04% potassium by weight), and is part of many minerals.


Most industrial chemical applications of potassium employ the relatively high solubility in water of potassium compounds, such as potassium soaps. Potassium metal has only a few special applications, being replaced in most chemical reactions with sodium metal.

Micronutrients

Boron (B)

  • Helps in the use of nutrients and regulates other nutrients. 
  • Aids production of sugar and carbohydrates. 
  • Essential for seed and fruit development. 
  • Sources of boron are organic matter and borax

Copper (Cu)

  • Important for reproductive growth.
  • Aids in root metabolism and helps in the utilization of proteins. 

Chloride (Cl)

  • Aids plant metabolism. 
  • Chloride is found in the soil. 

Iron (Fe)

  • Essential for formation of chlorophyll.
  • Sources of iron are the soil, iron sulfate, iron

    Manganese (Mn)

Macronutrients

What are Macronutrients?

Micronutrients are those elements essential for plant growth that are needed in only very small (micro) quantities. These elements are sometimes called minor elements or trace elements, but the use of the term micronutrient is encouraged by the American Society of Agronomy and the Soil Science Society of America. The micronutrients are boron (B), copper (Cu), iron (Fe), chloride (Cl), manganese (Mn), molybdenum (Mo), and zinc (Zn). Recycling organic matter such as grass clippings and tree leaves is an excellent way of providing micronutrients (as well as macronutrients) to growing plants.

Nitrogen (N)

    • Nitrogen is a part of all living cells and is a necessary part of all proteins, enzymes, and metabolic processes involved in the synthesis and transfer of energy.
    • Nitrogen is a part of chlorophyll, the green pigment of the plant that is responsible for photosynthesis.
    • Helps plants with rapid growth, increasing seed and fruit production and improving the quality of leaf and forage crops.
    • Nitrogen often comes from fertilizer application and from the air (legumes get their N from the atmosphere, water or rainfall contributes very little nitrogen)

Phosphorus (P)

    • Like nitrogen, phosphorus (P) is an essential part of the process of photosynthesis.
    • Involved in the formation of all oils, sugars, starches, etc.
    • Helps with the transformation of solar energy into chemical energy; proper plant maturation; withstanding stress.
    • Effects rapid growth.
    • Encourages blooming and root growth.
    • Phosphorus often comes from fertilizer, bone meal, and superphosphate.

Potassium (K)

    • Potassium is absorbed by plants in larger amounts than any other mineral element except nitrogen and, in some cases, calcium.
    • Helps in the building of protein, photosynthesis, fruit quality and reduction of diseases.
    • Potassium is supplied to plants by soil minerals, organic materials, and fertilizer.

Calcium (Ca)

    • Calcium, an essential part of plant cell wall structure, provides for normal transport and retention of other elements as well as strength in the plant. It is also thought to counteract the effect of alkali salts and organic acids within a plant.
    • Sources of calcium are dolomitic lime, gypsum, and superphosphate.

Magnesium (Mg)

    • Magnesium is part of the chlorophyll in all green plants and essential for photosynthesis. It also helps activate many plant enzymes needed for growth.
    • Soil minerals, organic material, fertilizers, and dolomitic limestone are sources of magnesium for plants.

Sulfur (S)

    • Essential plant food for production of protein.
    • Promotes activity and development of enzymes and vitamins.
    • Helps in chlorophyll formation.
    • Improves root growth and seed production.
    • Helps with vigorous plant growth and resistance to cold.
    • Sulfur may be supplied to the soil from rainwater. It is also added in some fertilizers as an impurity, especially the lower grade fertilizers. The use of gypsum also increases soil sulfur levels.

Beetles – Pest

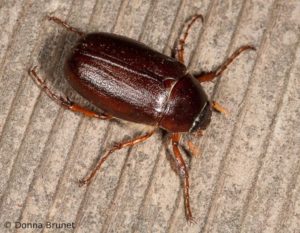
May Beetles

Beatles eat plumeria leaves and flowers at night, usually during the months of May and/or June.  

May Beetles – Phyllophaga spp., Scarabaeidae, COLEOPTERA

DESCRIPTION

Adult — Many species of May beetles (also known as June beetles) occur in any given area. They are shiny, robust insects, reddish-brown to black in color. Oblong in shape, they reach a length of 20 to 25 mm.

Egg — The eggs are pearly white and oblong. Each one, initially about 2.5 mm long and 1.5 mm wide, becomes slightly larger as the larva inside grows.

Larva — Commonly called white grubs, the larvae are white and C-shaped, with a distinct brown head. Young larvae are about 5 mm long, but attain a length of about 25 mm. Two rows of hairs on the underside of the last abdominal segment distinguish true white grubs from similar grubs.

Pupa — The oval, brownish pupae occur within earthen cases.

BIOLOGY

Distribution — More than 200 species of May beetles occur throughout North America. Therefore, a single species population is seldom found. In North Carolina they are most numerous from the Piedmont to the coast.

Host Plants — Although oaks are the favorite food source, adult May beetles also feed on the foliage of many other trees. Larvae prefer lespedeza, sod and corn, but they too have additional host foods which include lawn grasses and nursery plantings.

Damage — Both larvae and adults are destructive. The adults are defoliators, chewing the leaves of various hardwood trees. The grubs feed on and injure the root systems of grasses and other plants. Heavily infested turf can often be rolled up like a carpet, exposing the white grubs.

Life History — May beetles have a 2 or 3 year life cycle, depending upon the species. They overwinter in the soil as larvae in two distinct sizes and as adults that have never flown. In the spring, the adults emerge from the ground in the evening, feed on tree leaves, and mate during the night. They return to some sheltered site in the morning. Females then enter the ground to deposit about 50 eggs in earthen balls. The egg-laying period lasts a couple of weeks. In 3 to 4 weeks, grubs hatch from the eggs and feed on dead organic matter, later moving to the roots of plants. The larvae molt twice, the second and third instars being the overwintering forms. In late August, the second and third instars burrow over 1 meter deep into the ground to hibernate. The larvae do the most damage during the second year. In early spring, third instar larvae construct earthen cells in which they pupate. Adult beetles emerge from pupal cases in late summer, but do not leave the ground; instead, they overwinter there and emerge the next spring.

CONTROL

Sections of turf approximately 929 sq cm (1 sq ft) and 5 to 10 cm (2 to 4 in) deep should be examined for May beetle grubs. On golf fairways, 10 to 12 samples of this size should be taken. If examination reveals an average of three grubs per 929 sq cm (roughly 1 sq ft), treatment is probably necessary.

For specific chemical control recommendations, consult the state agricultural extension service.

Leaf Miner – Pest

Leaf Miner

Any insect which lays its eggs in the spongy layer between the upper and lower surfaces of leaves is known as a leaf miner. Larvae develop between the leaf surfaces and tunnel or ‘mine’ out the spongy middle layer as they grow, giving leaves a spotty and brownish appearance. The four stages of its development are egg, larva (leaf miner), pupa, and adult (a small fly).

Control

Although the mines may be considered to be unsightly, this pest can be tolerated as it has a little real impact on the health and vigor of a holly. Leaves with mines may turn yellow and drop in early summer but this is the natural shedding of older leaves and not due to the pest.

Pinch the leaves of small trees to kill the leaf miner.

Insecticides are unlikely to be effective as the thick glossy surface of holly leaves means that sprays run off the foliage and do not penetrate to where the grubs are feeding. On small specimen plants, it is feasible to remove mined leaves but not if this would result in significant defoliation.

When the leaves are fully formed in late April or early May, this is your first opportunity to use insecticides. Managing leaf miners at this time can significantly reduce the chance of a problem later in the season. In June, if populations are severe, time your insecticide application to coincide with the second period of adult flight. Once you’ve noticed that the larvae have left the leaf, start to look for adults emerging two to three weeks later. Apply insecticides when most of the adults have emerged. Using insecticides to manage late season generations is generally not worth it. If late season problems are severe, consider an insecticide application next spring.

Nematodes – Pest

Nematodes

Microscopic, eel-like roundworms. The most troublesome species in the garden are those that live and feed within plant roots most of their lives and those that live freely in the soil and feed on plant roots.

Root knot nematodes usually cause distinctive swellings, called galls, on the roots of affected plants. Infestations of these nematodes are fairly easy to recognize by digging up a few plants with symptoms, washing or gently tapping the soil from the roots, and examining the roots for galls. The nematodes feed and develop within the galls, which may grow to as large as 1-inch in diameter on some plants but are usually much smaller. The water- and nutrient-conducting abilities of the roots are damaged by the formation of the galls. Galls may crack or split open, especially on the roots of vegetable plants, allowing the entry of soilborne, disease-causing microorganisms.

Control

Management of nematodes is difficult. The most reliable practices are preventive, including sanitation and choice of plant varieties. Existing infestations can be reduced through the following, crop rotation, or soil solarization. However, these methods reduce nematodes primarily in the top foot or so of the soil, so are effective only for about a year. They are suitable primarily for annual plants or to help young woody plants establish themselves. Once an area or crop is infested, try to minimize damage by adjusting planting and harvesting dates and irrigation or by the use of soil amendments.

Nematodes are usually introduced into new areas with infested soil or plants. Prevent nematodes from entering your garden by using only nematode-free plants purchased from reliable nurseries. To prevent the spread of nematodes, avoid moving plants and soil from infested parts of the garden. Do not allow irrigation water from around infested plants to run off, as this spreads nematodes. Nematodes may be present in soil attached to tools and equipment used elsewhere, so clean tools thoroughly before using them in your garden.