The Moragne Plumeria

Fifty years ago, a dedicated amateur made the first controlled crosses of these fragrant tropicals.

Richard A. Criley & Jim Little
Published April 01, 1991

Plumerias, which are native to the semideciduous forests of southern Mexico and south into Panama, were described as early as 1522 in the Badianus Manuscripts by Francisco de Mendoza, a Spanish priest who was one of the first explorers of the region. According to this collection of Aztec lore, the Indians used the plants for medicinal purposes that ranged from poultices to emetics. Soon the hardy shrub with beautiful fragrant flowers was a favorite of the Spanish, who planted it around their churches, monasteries, and cemeteries, and took it with them as they explored the world.

The plumeria has also acquired religious significance in India, where it is known as the temple tree or pagoda tree. There, Buddhists and Moslems regard the tree as a symbol of immortality because of its capacity to produces flowers from stems severed from the parent tree. Hindus use the flower as a votive offering to the gods.

The flower’s botanical name honors the seventeenth-century French botanist, Charles Plumier. Some horticultural historians say that the common name, frangipani, was derived from the French word, frangipanier, meaning coagulated milk, which its sticky white latex resembles. Others believe it honors a twelfth-century Italian who compounded a perfume similar to that of these tropical flowers that were discovered some four centuries later.

Because Plumeria flowers and leaves come in so many forms, taxonomists once held that there could be forty-five or more species. Of course, these variations are not enough to justify naming a separate species. The “lumpers” of the taxonomic trade-as well as Hortus Third-now say there are perhaps only seven or eight species, and that most of those in the popular books on tropical flowers are really only variations of Plumeria rubra. “Splitters” among taxonomists still dissect out some other species, as do floras of Mexico and other Central American countries.

The first plumeria was introduced into Hawaii in 1860. It was a yellow brought in by Wilhelm Hillebrand, a German physician and botanist who lived in Hawaii from 1851 to 1871. The first red is thought to have arrived from Mexico around the turn of the century, either via a Mrs. Paul Neumann, wife of a consul stationed in Honolulu, or a Mr. Gifford, landscaper for the Royal Hawaiian Hotel. The white ‘Singapore’ plumeria was brought to Hawaii in 1931 by Harold Lyon, director of a sugar cane research station, from a large collection established in 1913 at the Singapore Botanical Gardens.

Since then, natural hybridization has given rise to many variations in form and scent, making them popular among collectors, who in 1979 established their own admiration society for this plant, the Plumeria Society of America.

But as late as between plumerias. In that year, William M. Moragne Sr. became manager of Grove Farm Plantation on Kauai, which specialized in sugar cane, pineapple, and cattle. Moragne (pronounced “Mor-AY-nee”), who was born in Hilo, Hawaii, in 1905 and graduated from the University of Hawaii with a major in civil engineering and sugar technology, was an avid lover of plants and had always wanted to experiment with cross-pollinating plumerias. But because there were no books to tell him how to proceed, he had to learn on his own.

The plumeria’s pistil-the stigma, style, and ovary that are the female reproductive parts-is located at the bottom of a very deep trumpet, and efforts to tear away the petals to reach the pistil produced a torrent of sticky white latex. So Moragne snipped off the petals at the tube and allowed them to “bleed” to get rid of the latex. The pollen of the mother flower was carefully scraped away before introducing the pollen of the male parent. But after three years of effort, he failed to produce a single seed pod.

Then in 1953, reflecting on the fact that the flowers were deep throated, Moragne realized that they would have to be pollinated naturally by little bugs crawling down into the throat and climbing around the pistil. In doing so, they would leave some pollen grains under the pistil, as well as on top. Perhaps, he reasoned, he should also place pollen under the pistil. He carefully transferred pollen to the sides and base of the pistils of four blossoms through an incision cut into the side of the flower tubes. His pollinations were carried out in the morning on newly opened flowers. After the pollen was transferred, he covered the pollinated area with plastic tape to prevent uncontrolled pollen from being carried in by insects.

Several weeks later, he realized that seed pods were beginning to swell the base of the flowers he had cross-pollinated. From those seeds he obtained 283 seedlings. The thirty-five he kept produced small trees with large, brilliant, fragrant blossoms, some of which bloom for six to eight months. Moragne at first numbered the seedlings as they came into bloom-some took five years to bloom, others as long as eighteen-but then began to select the largest flowers among the more brightly colored ones to name for the women of his family.

Only three of his eleven named hybrids- ‘Jean Moragne Jr.’, named for a daughter-in-law, and ‘Edi Cooke’ and ‘Julie Cooke’, named for two of his granddaughters-have been registered with the Plumeria Society of America, which came into existence just four years before his death in 1983*. In the late 1980’s a renewed interest in plumeria led to great demand for cuttings of his hybrids at botanical garden plant sales. But as with many vegetatively propagated plants, cuttings had found there way into many gardens in Hawaii and abroad, sometimes with a name change along the way.

Now, more than forty years after he developed his series of hybrids, there is confusion about the parentage of these historic crosses. According to the Register of Plumeria Culture, the male parent is ‘Scott Pratt’ and the female parent is called ‘Daisy Wilcox’. But in a 1974 newspaper article, Moragne was quoted as saying his hybrids were a cross between ‘Grove Farm’ and an otherwise unknown ‘Koloa Red’. In trying to update the Register for the society in 1988, John P. Oliver asked for help in finding out which was right.

Although Moragne reportedly kept records relating to his breeding breakthrough, none can be located today. The answers had to be found by talking to his daughters, Mary Moragne Cooke, Sally Moragne Mist, and Katie Moragne Bartness, and a long-time plantsman on Kauai, Howard Yamamoto.

Among the plumerias in Moragne’s garden near Lihue, Kauai, was the cutting of a chance seedling originally collected from Lawaii Kai on the southern side of Kauai by plumeria enthusiast Alexander McBryde. The cutting was planted there when the plantation was still being managed by a couple named Ralph and Daisy Wilcox. Daisy Wilcox demurred at the suggestion that the flower be named for her, and Moragne-whether bowing to her wishes or simply because he preferred place names, called it ‘Grove Farm’. Nevertheless, the name ‘Daisy Wilcox’ stuck among plumeria growers on the island, and ‘Daisy Wilcox’ it became officially when plumerias began to be registered many years later. ‘Daisy Wilcox’, a large, white-flowered plumeria with a pink stripe on the underside of the petals, bears little resemblance to a plumeria now registered as ‘Grove Farm’, a grainy pink one also found on Kauai. The large flower and tree size of most of the named selections, coupled with a letter written by Moragne in 1973, leave no doubt that the ‘Grove Farm’ plant he used was the large-flowered one.

Records relating to the male parent are even more conflicting. The only place the name ‘Koloa Red’ appears is in a 1974 newspaper interview. It may have been a reporting or typographical error; no one knows. In a 1975 account, Mary Moragne Cooke related that ‘Grove Farm’ was crossed with ‘Kohala Red’; more recently, she discovered a slide dated 1955 that identifies the hybrid here father named after here as a cross of ‘Kohala’ on ‘Grove Farm’.  

There is little question that ‘Kohala Red’ is a synonym for a dark red plumeria eventually registered as ‘Scott Pratt”. Pratt was the farm manager of the Kohala Sugar Plantations on the island of Hawaii. Once again, Moragne preferred the place name.

Cuttings from the series provided by Moragne to University of Hawaii plumeria breeder Ted Chinn in 1967 carried the notation in the accession book: ‘Kohala’ on ‘Grove Farm’ or ‘Scott Pratt’ on ‘Daisy Wilcox’. Both are right, given the synonymous names for the red and the confusion over the large white. But due to the registration of plumeria names and descriptions with the Plumeria Society of America, ‘Scott Pratt’ must be listed as the male parent and ‘Daisy Wilcox’ as the female parent for the Moragne series. (This is an unrecorded marriage in the history of Hawaii’s long-time or kama’aina families, which may well support Moragne’s preference for place names.)

None of the surviving selections have the small flowers or dark red color of ‘Scott Pratt’. The strong yellows in some of them are not seen in either of the parents, but this isn’t surprising given that Moragne selected for large size and colorful petals.

More than twenty years after the crosses were made, recollections are also vague about how many flowers Moragne actually attempted to pollinate. It is well documented that he harvested seed from the pods of four flowers and from them produced 283 seedlings, naming his favorites for his wife, “Jean Sr.”; daughters Mary, Sally and Katie; daughter-in-law “Jean Jr.”; and granddaughters Cindy, Kimi, Julie, Edi, Cathy, and Kelly.

He planted fifteen around his home, and set out nine other hybrids and the rest of his breeding collection along the Nawiliwili highway that once led into Grove Farm, near the present-day Ulu Ko subdivision. The plants are not identified-Moragne removed the tags before planting them-but are still much admired, so much that many cuttings have been poached over the years.

When asked why he had not continued his pollination work, Moragne responded that with 400 potted orchids and a garden of heliconias and gingers, he didn’t have time or space for another 283 plumerias. He had selected the best and that was enough.

Today, a few of the best of the Moragne hybrids are used for leis or worn pinned in the hair or wired as nosegays. From their ‘Daisy Wilcox’ parentage, some-primarily the numbered ones-inherited a rangy growth habit, but others are more compact and suited to landscape use.

Moragne gave cuttings to Foster Garden, the University of Hawaii, And the Pacific Tropical Botanical Garden. Shortly before his death, he gave cuttings to Jim Little, a photographer and university instructor and amateur botanist whom he also taught how to hand-pollinate plumerias. Little and a few others plumeria hobbyists have kept Moragne’s legacy alive.

His hybrids represent a rare ability to choose only the best from a seedling population. It has been a long time since those initial plants were chosen, and their distribution has been limited by the isolation of the source and the lack of awareness among individual nurserymen of the uniqueness of these plants. It is time that these brilliantly colored, fragrant trees receive the recognition they deserve through more widespread propagation and use in tropical and protected subtropical landscapes.


RESOURCES & SOURCES

Jim Little Nursery & Farms, Hawaii
Richard A. Criley, University of Hawaii at Manoa
The Plumeria People, Houston, Texas
The Exotic Plumeria (Frangipani), by E. H. Thornton and S. H. Thornton, 1985
The Handbook on Plumeria Culture, by R. Eggenberger and M. H. Eggenberger, 1988


Dr. Richard A. Criley is professor of horticulture at the University of Hawaii at Manoa.  Jim Little is a retired assistant professor since 2000.  He runs one of the largest plumeria nurseries, located in Hawaii .

*The Plumeria Society of America was formed in 1979.

Growing Plumeria from Seed – Introduction

Whether you plan on growing plumeria for pleasure or profit, you should know growing from seeds is a major commitment that grows bigger and bigger every year.

Growing a plumeria from seed is the only way to produce a new cultivar. Typically it will take a plumeria 2-3 years to bloom and sometimes much longer. I believe only 1 out of 500 seedlings is worthy of growing to the point of being a commercially viable plumeria. And, it could take as long as 10 years to have enough product to bring to market. This is the main reason the newest cultivars cost more.

So, if you have the commitment and really want to make an incredible journey, I encourage you to grow plumeria from seed. It is a very rewarding journey and the feeling you get when you see YOUR seedling blooming for the first time is a feeling you will never forget. It won’t matter if it is a world class plumeria flower or just a common white. The first is always special, but you will have that feeling of anticipation and excitement with every new seedling bloom.

Growing Plumeria from seeds has been my passion for many years. This year is no different, it’s time to try new things and have new successes and of course failures. Armed with all the data from past years, it an ongoing goal to determine what the best methods are for my growing environment, needs, and budget. Some methods may be outstanding, but for me, they are far too labor intensive. Some products may work great but maybe just too expensive to justify using. With all this in mind, the first thing to do is develop a plan for the next seedling project.

Plumeria Seed Selection 

IT’S EXTREMELY RARE FOR PLUMERIA SEEDS TO GROW TRUE TO IT’S PARENT(S). This is a very important fact to know. The good news, you can expect plumeria seeds to inherit some of its parent’s characteristics possibly going back 7 generations. The bad news is, most will inherit the less desirable characteristics. So the selection of which seeds you want grow is very important.

Selecting healthy seeds is imperative if you are going to spend a lot of time and energy growing plumeria seeds, you deserve to have the best chance of success possible. 

Whether you are growing for fun or pleasure, you should select quality seeds from a trusted grower who will guarantee the pod parent. I would suggest you purchase a complete seed pod when possible or at least all the seeds in a seed pod. Be cautious of any seller who claims to know the pod and pollen parents, unless they are a very respected grower. Even though a plumeria seed typically does not grow true to its parent(s) you can improve the chances of getting an outstanding plumeria by knowing as much about a seed’s heritage as possible. Selecting seeds from a cultivar know to produce good seedlings is a good practice.

Viability Testing

A dormant plumeria seed certainly looks dead. It does not seem to move, to grow, nor do anything. In fact, even with biochemical tests for the metabolic processes we associate with life (respiration, etc.) the rate of these processes is so slow that it would be difficult to determine whether there really was anything alive in a seed.

Testing the viability prior to planting can be a resource and time saver. The viability of plumeria seeds can be checked by using one of several methods. 

Quick check: By simple feeling the seed to see if it feels firm and thicker in the center of the seed, there is a good chance it is viable.

Drop the seed in a bowl of lukewarm water and allow to set for several hours, as the seed takes on water and removes air it will sink in the bowl. If a seed sinks, there is a good chance it is viable.

Germination

If a plumeria seed is not allowed to germinate (sprout) within some certain length of time, the embryo inside will die. Each species of seed has a certain length of viability. Some plumeria seeds have been known to germinate after 12 years. It is best to plant within a few months of being dispersed. It is believed a few cultivars, such as Dwarf Singapore Pink, will lose viability as it dries out and should be planted as soon as possible.

Assuming the seed is still viable, the embryo inside the seed coat needs something to get its metabolism activated to start the embryo growing. The process of getting a plumeria seed to germinate is simple.

Plumeria seeds lack true dormancy. The seeds are ready to sprout. All they need is some moisture to get their biochemistry activated, and temperature warm enough to allow the chemistry of life to proceed.

Place the seed in soil with the fan part of the seed sticking up out of the soil and water well, keep the soil moist. The seed will germinate in a few days and you will seed the seed emerge within 5-10 days, sometimes longer.

Spread the seeds out on soil laying flat in a try and cover with 1/4″ of soil. Water well and keep the soil moist. The seed will germinate in a few days and you will seed the seed emerge within 5-10 days, sometimes longer.

Place the seed between two paper towels, soak with water, place the towels in a warm area. Allow to sit until you see roots developing. Do not allow the towels to dry out, if the seeds start to germinate and then dries, it could stop it from germinating. As soon as roots appear, it is time to plant. You should see roots within a few days.

The seed cotyledon, which forms in the embryo of a seed before germination, stores food for the embryo. Along with the endosperm, the cotyledon nourishes the new growth of the plant. It is the part of the seed that emerges from the testa, or hard covering, during germination. It grows upward, turning into a set of seed leaves as the seed germinates, using photosynthesis to nourish the newly forming plant further. The seed leaves will fall off after true leaves form.

Initial Transplanting to soil & the First 3 Months of Growth

After true leaves form the growing needs change. As the seedling grows it will need more sunlight, warmth, moisture and nutrients. I believe the first three months of a seedlings life is the most important.

In 2016, I performed an experiment where I applied Excalibur granular fertilizer to a two month old group (Group “B”) of seedlings, I keep another group for control (Group “A”) without additional fertilizer, after 5 weeks I compared the groups. Group “B” had grew approximately 24% more in height and has substantially more roots. After 2 months, I added the same granular fertilizer to Group “A” and started treating both the same after that. The interesting fact is, after 10 months there was still a 24% difference between Group “A”  and Group “B”. I will continue to track the grow of these groups over the next few year.

From 3 Months to Bloom

After approximately 3 months, it is important to start treating seedlings as young adults. For me this means, water as soon as needed, fertilize with micronutrients, organic mater, bio-stimulates, etc. that enhance the roots system and overall maturity of the plant. At the same time, I provide additional nutrients to the leave and tips to keep the plant healthy and pest free. The goal is to allow the plumeria to mature as much as possible in the shortest amount of time. It is important to understand the concept of “allow the plumeria to mature”. What I stress is to provide a balanced diet of nutrients, organic mater, bio-stimulates, moisture and heat without overdoing or under doing any one factor.

Right now I would say 99% plus of all plumeria seeds produced are pollination by nature. My overall goal is to grow seedling to bloom and establish a reliable seedpod parents to use with cross-pollination projects. I’m fortunate to have a company like Florida Colors Nursery with a real need to grow seedling for root stock and new plumeria for future sales. This provides a need for the 99% of our seedling that will not be outstanding enough to grow to a marketable size.  

About Potting Soil for Plumeria

About Potting Soil for Plumeria

Low-quality or substandard potting media is a major source of problems with plumeria grown in containers (and, really, any container-grown plants). Plumerias that are potted in substandard or old decomposed potting soil are weaker than healthy plants, so they’re more likely to drop leaves, turn yellow, attract pests and just generally die.

Potting media, of course, is just one of the factors that contribute to healthy plumeria. But because most people only re-pot when they have to, it’s actually the hardest single factor to quickly control. Other factors that are much easier to control include moisture levels, pH, humidity, temperature, and light levels.

Because potting soil is so important and relatively hard to change, it’s extra important to pay careful attention to your potting media and start off with the best possible mix. Your plumeria will thank you for it, and ultimately, you’ll end up with healthier plumeria and more blooms.

It’s important to remember that all potting soil will be depleted of its nutrients by the plants in the pot, including your plumeria and weeds.

A good potting soil (media) should:

  • Provide support for the growing plant
  • Provide adequate drainage, very important for Plumeria
  • Provide adequate available nutrients (usually through fertilizer and/or organic matter added to the soil)
  • Provide adequate aeration around the roots

You can easily find many good potting mixes. Most are based on sphagnum peat moss, with additives like compost, humus, perlite, vermiculite, and pumice. Some have water-retention crystals, these are not good for plumeria. You can also find soils with fertilizer added, pine bark, and other ingredients like coir, seaweed, and worm castings. I prefer to use a non fertilized soil mix, that way I know what I’m starting with.

For plumeria it is important the soil you select allows for adequate drainage, has air pockets around the root zone and critically, how long does it last before the inevitable decay sets in (all organic things decay) and starts to lose its desirable qualities?

Well prepared garden soil is great for growing Plumeria in the ground but when it comes to growing Plumeria in containers, it needs to be changed improved, or changed as the roots grow and use up the nutrients.

Soils for containers need to be well aerated and well drained while still being able to retain enough moisture for plant growth.

When choosing what to use to fill containers, never use garden soil by itself no matter how good it looks or how well things grow in it out in the garden. When put into a container both drainage and aeration are severely impeded, and the results are that plumeria grows poorly or not at all.

Soils for containers need to be modified in some way to ensure proper drainage and aeration. Container soils are often referred to as soilless or artificial media because they contain no soil at all. They are often composed of various things such as peat, perlite, vermiculite, bark, coir fiber (ground coconut hulls) in a variety of recipes depending on the manufacture and the type of plant material being grown. They can be found under a variety of trade names and in sizes ranging from a few quarts to bales that are many cubic feet in size. The choice of growing media for plumeria is well drained and doesn’t retain a lot of moisture over a long period of time. You should choose media that’s courser in texture containing more bark, perlite, or sand.

When soil mixes are used, they should be moistened slightly before planting. Fill a tub with the media, add water and lightly fluff the media to dampen it.

Some garden soils can be used as a container media but it needs to be modified or amended. An acceptable soil based mix can be made by using one part garden soil, one part peat moss, and one part perlite or coarse builders sand. Don’t use fine beach sand or play sand.

Advantages and Disadvantages

The disadvantage is that the soil you are using may contain insects, weed seeds, and disease organisms. Soilless media are generally free of these things. Soil-based media are heavier. This may be an advantage though especially if the containers are used in a very windy location and the extra weight will help keep the pot upright. Soil-based media are also a bit more forgiving when it comes to water and fertility. They tend not to dry out as fast, and they also tend to hold on to nutrients longer. Because soilless media can be a bit more costly, you could mix 25 percent soil with the soilless media to stretch your soilless media for a few more pots.

Can soilless media be reused from year to year? If the plants in the containers were healthy during the growing season with no major disease issues, you could remove the plant material at the end of the season and reuse the media next season. A good way to make sure you soil disease free by putting the soil in a black plastic bag and keep in full sun for a week or so, rotating the bag every few days. You may also have to add some additional new media to fill the container. There will come a time when the media in the container will need to be replaced. Over the course of time, the organic materials that the soilless media is made from a breakdown and decompose to the point where you will lose a lot of nutrients, drainage, and aeration properties that are inherent in soilless container media. When that happens, discard the media to the compost pile or to the garden and refill the container with fresh media.

There are also bagged products labeled as topsoil that tend to be largely sedge peat. While they are inexpensive and look very good, once put into a pot they are poorly drained and poorly aerated. They can be used in combination with soilless media products or amended much the same way as if you were using garden soil.

When filling containers with media, don’t fill the pot to the top. Leave about a one-inch space between the top of the soil and the rim of the pot. This will help make watering the pot easier as it provides a place to “put water” and not have it run over the edge.

Filling very large containers can be costly especially when using commercially prepared media. To reduce the cost and also the weight of the container consider adding “filler” to the bottom of the container to take up space. Many things can be used, but the chipped mulch will decompose and add nutrients to your pot over the course of the growing season.

Soil and Soil Mixes

Soil and Soil Mixes

Garden soil is great for growing Plumeria in the ground but when it comes to growing Plumeria in containers, it needs to be amended to improve drainage and adjust its ability to maintain moisture. Also, you will need to make sure the pH is correct for plumeria. You will still need to change the soil in your pots as your plumeria use up the nutrients. 

Soils for containers need to be well aerated and drain well while still being able to retain enough moisture for plant growth.

When choosing what to use to fill containers, never use garden soil by itself no matter how good it looks or how well things grow in it out in the garden. When put into a container both drainage and aeration are severely impeded, and the results are that plumeria grows poorly or not at all.

Soils for containers need to be modified in some way to ensure proper drainage and aeration. Container soils are often referred to as soilless or artificial media because they contain no soil at all. They are often composed of various things such as peat, perlite, vermiculite, bark, coir fiber (ground coconut hulls) in a variety of recipes depending on the manufacture and the type of plant material being grown. They can be found under a variety of trade names and in sizes ranging from a few quarts to bales that are many cubic feet in size. When choosing a growing media for plumeria it is important to make sure it drains well and doesn’t retain too much moisture over a long period of time. You should choose media that’s courser in texture containing more bark, perlite, or sand.

When soil mixes are used, they should be moistened slightly before planting. Fill a tub with the media, add water and lightly fluff the media to dampen it.

Some garden soils can be used as a container media but it needs to be modified or amended.

An acceptable soil mix can be made by using:

  • one part garden soil
  • one part peat moss
  • one part decomposed mulch and
  • one part perlite.

CAUTION: Don’t use fine beach sand or play sand. If you must use sand use coarse builders sand.

Advantages and Disadvantages

Soil or soilless mix media?
The disadvantage is that the soil you are using may contain insects, weed seeds, and disease organisms. Soilless media are generally free of these things. Soil-based media are heavier. This may be an advantage though especially if the containers are used in a very windy location and the extra weight will help keep the pot upright. Soil-based media are also a bit more forgiving when it comes to water and fertility. They tend not to dry out as fast, and they also tend to hold on to nutrients longer. Because soilless media can be a bit more costly, you could mix 25 percent soil with the soilless media to stretch your soilless media for a few more pots.

Can soilless media be reused from year to year?
If the plants in the containers were healthy during the growing season with no major disease issues, you could remove the plant material at the end of the season and reuse the media next season. A good way to make sure your soil is free of diseases is by putting the soil in a black plastic bag and keep in full sun for a week or so, rotating the bag every few days. This will sterilize the soil. You may also have to add some additional new media to fill the container. There will come a time when the media in the container will need to be replaced. Over the course of time, the organic materials that the soilless media is made from will break down and decompose to the point where you will lose a lot of nutrients, drainage, and aeration properties that are inherent in soilless container media. When that happens, discard the media to the compost pile or to the garden and refill the container with fresh media.

An acceptable soil mix using old soil using:

  • one part old soil
  • one part peat moss
  • one part decomposed mulch and
  • one part perlite.

There are also bagged products labeled as topsoil that tend to be largely sedge peat. While they are inexpensive and look very good, once put into a pot they are poorly drained and poorly aerated. They can be used in combination with soilless media products or amended much the same way as if you were using garden soil.

When filling containers with media, don’t fill the pot to the top. Leave about a half inch of space between the top of the soil and the rim of the pot. This will help make watering the pot easier as it provides a place to “put water” and not have it run over the edge.

Filling very large containers can be costly especially when using commercially prepared media. To reduce the cost and also the weight of the container consider adding “filler” to the bottom of the container to take up space. Many things can be used, but pine mulch will decompose and add organic nutrients to your pot over the course of the growing season. Do not use colored much, it may have chemicals that could harm your plumeria.

A Guide to Growing Plumeria From Seed

A Guide for Growing Plumeria From Seed by Tex Norwood

This guide shares the basic methods I use for growing plumeria from seed, caring for seedlings, and the products I use. I hope this guide helps you with your seed goals for the year.

There are many proven methods to growing plumeria from seed and you should examine to see if any could help you develop a method that works for you. This is only a guide and should be adjusted to your seed growing environment.

When I have a batch of seeds, I examine what I did in the past and determine if I can make any improvement. The following is my detailed plan for growing plumeria from seed in 2018. This plan covers from germination until they first produce blooms.

Please keep in mind your growing environment and the differences from South Florida Zone 10B. The start of your plan should correspond to when you are past the threat of a frost or freeze. You should also make plans to protect your plumeria from cold weather, just in case you have a late freeze or frost. 

My goal is to know what, when, and why, so I can improve my method every year or even with each batch. Documenting all adjustments as you go will allow you to look back and better determine where you can make improvements.

Why do I grow seedlings?
          1. To grow new and exciting cultivars
          2. To grow rootstock for grafting
          3. But most of all to see that one-of-a-kind flower for the first time.

Using the methods and products below; I have been able to get about 10% of my seedlings to bloom in less than 12 months and about 60% to bloom in 18 to 24 months. The majority of the remainder bloom from 24 to 36 months. (Some do still take 3 years and even longer.)

What you will need: Plumeria Seeds, something to soak them in, paper towels, 2” x 3” Gro-Tech FlexiPlugs and trays or plugs or good seedling soil mix to plant the seeds in, Vitazyme, Carl Pool’s Root Activator, Bioblast 7-7-7, Pro-Mix BX Mycorrhizae, Excalibur VI 11-11-13, Labels and permanent felt tip marker. Hydrogen Peroxide is good to use for mold or fungus.

Seed selection

Seed selection is very important when growing plumeria seeds. Plumeria Rubra seeds do not produce true to their parents. Sometimes a seedling will look like its parent, but it will never be exactly the same.  A few characteristics to consider:

  • Flower: Color, size, keeping quality (how long it lasts after picking), fragrance, etc.
  • Tree: Growing habit, size, etc.
  • Leaves: Color, size, etc.
  • Blooming: Quality, size of inflorescence/flower stalk, number of flowers blooming at the same time, how long does it bloom, etc.

I’m always trying to improve my chances of getting that spectacular plumeria seedling.

If possible:

  • Select a pod parent that is known to produce the characteristics you desire or at least a pod parent that has the characteristics you desire.
  • Obtain seeds from trusted growers.
  • Find out the history of the pod, e.g., What’s growing close to the pod? Did they bloom at the same time? Was it cross-pollinated, manually pollinated, or pollinated by nature?
  • Obtain all the seeds from a pod when possible.
  • Select seeds from a healthy tree.
  • Select seeds that are plump and look healthy.

Before you plant your seeds

Soak plumeria seeds to test the viability and soften the shell to give them a kick start.

When: Plumeria seeds germinate best in the spring, but can be germinated any time if provided with enough moisture and warmth staying above 60 degrees.

What: Use quality seeds, warm water, and Vitazyme

How: 

  1. First, examine each seed by placing it between two fingers. If they have some thickness, they most likely are viable. If they feel paper-thin, they most likely are not viable.
  2. For faster germination and rooting, dilute Vitazyme with warm water at a rate of 1 oz to 19 oz of water, a 5% solution, and dip or mist both sides of the seed. Allow seeds to dry prior to planting or soaking.
  3. For a soaking mixture, dilute Vitazyme with warm water at a rate of about 1.29% or 1 oz to 128 oz (1 gallon).
  4. Place your seeds in the container, place in a warm area, and allow to soak for approximately 4-6 hours (or even overnight). Soaking longer than overnight could cause damage to the seeds. Seeds that are very thin and are still floating are most likely not viable. To further test this, plant all the seeds, but mark the ones that did not sink.
  5. Check your seeds after several hours to see which seeds are absorbing enough liquid to allow germination and to sink to the bottom.
  6. Do not allow your seeds to dry out before you plant them.
  7. Now your seeds are ready to plant.

Why: 

  1. To soften the seed’s protective coating
  2. To allow the seed to absorb as much water as possible
  3. To test the viability of the seed
  4. To provide nutrients as early as possible, helping germination and starting the rooting process sooner

Preparing Plugs

When: Prior to planting seeds in plugs.

What: 2”x3” Grow-Tech peat plugs, warm water, Root Activator, and Vitazyme.

What we suggest: A mixture of warm water, Vitazyme, and Carl Pool’s Root Activator.

How: Soak your plugs in a mixture of 1 gal of warm water, 2 oz Root Activator, and 1 oz Vitazyme for about 2 hours.

Why: Vitazyme is a bio stimulate with vitamins that help the overall health of the seeds and the Root Activator adheres to the plugs or soil and gives the roots a kick-start. I use the plugs because they hold the right amount of moisture and provide ample aeration that allows the new roots to breathe.

Watering: Keep your plugs wet or leave them soaking until you are ready to plant the seeds.

Planting your seeds

When: Plant your seeds right after soaking into the prepared plugs. DO NOT allow either to dry out. If they dry out they could be damaged.

Plugs, Pots, or Trays, After Soaking, For the seeds, I grow for new cultivars, I prefer planting the seeds directly into 2″ x 3″ Grow-Tech FlexiPlugs, a foam peat plug. For the seeds, I’m growing for rootstock in flat trays or 4″ pots.

What: Carefully selected plumeria seeds, 2”x3” Grow-Tech FlexiPlugs. Warm water, Root activator, and Vitazyme. You will also need a 36-hole tray and a flat for the plugs. A cover is optional.

Why: The reason I use the plugs is they hold moisture allowing me to keep them soaked with water and still providing ample aeration and allowing the new roots to breathe. I use the 2” x 3” FlexiPlugs that allows me up to 14-21 days before I have to transplant to pots.

Watering – I grow Plumeria seeds in full sun and water 2-3 times a day depending on the weather. My goal is to keep the plugs very moist to the touch. I have had no damping off or rotting problems with this method.

Start Fertilizing – Foliage

When: Before transplanting the plugs into pots, after three or four true leaves have grown. I use the same mix ( see below) approximately every two weeks

What:  BioBlast 7-7-7 NPK fertilizer, Vitazyme

How: Foliar feeding early in the morning or late in the evening with Bioblast at 1 tablespoon per 1 gallon of water and Vitazyme at 1 tablespoon per gallon. Do not spray in the hot sun it will burn the seedling leaves.

Why: Seedlings have seed leaves that provide them with nutrients for the first few weeks of their life, but when the seed leaves dry up and fall off the seedling needs nutrients. Bioblast works with every part of your plant. Soil organisms are invigorated with Vitazyme bio-stimulants providing quicker, more vigorous growth. Roots are encouraged with our Root Activator. A balanced 7-7-7 NPK provides the essentials of plant growth and structure. B-Vitamins and Zinc encourage a robust immune system, while Iron promotes chlorophyll production in the leaves.

Watering – I continue to grow Plumeria the seedlings in full sun and water at least 2-3 times a day depending on the weather. My goal is to keep the plugs moist to the touch. I’ve had no damping off or rotting problems.

Transplanting to Pots and Fertilizing

When: As soon as I see roots sticking out of the plugsPlumeria seedling roots coming out of the Plugs grown from seed, transplant into larger pots. Normally I will use 1 gal pots, but this year I’m using 7.5 gal squat pots. Approximately 14 days after planting in the plugs.
What: ProMix BX Mycorrhizae, Excalibur VI 11-11-14 with micronutrients, Vitazyme, and Root activator.

How: Fill 1 gal. pot with a mixture of ProMix BX Mycorrhizae mixed with 2 tablespoons of Excalibur Vi. Fill a 7 1/2 gal. squat pot with ProMix BX Mycorrhizae or the mix of your choice, dig an area our in the mix about the size of a 1 gal pot, port the contents of the 1 gal pot in the hole, then punch a hole about the size of the FlexiPlug (about 2″x3″) in the center of the filled 7 1/2 gal pot. Place the plug in the hole and press the mix firmly around the plug. Water in well with a mix of Vitazyme 1 oz to 1 gal and Root Activator 2 oz to 1 gal. You may need to add more soil mix if the plug is not covered completely with at least ½” of the mix. Water again the next day and then when the soil is almost dry. I would suggest using a water meter from time to time to verify the moisture content. It is very important the soil does not stay wet.

Why: Promix BX contains Mycorrhizae and is a fast-draining mix. The Excalibur VI, a 6-month granular slow-release fertilizer designed specifically for plumeria that provides all the nutrients a seedling needs to grow strong. Vitazyme a bio-stimulate helps the overall health of the seedlings and the Root Activator adheres to the soil and is there to help the roots develop and grow faster.

Watering – Water once a day for the first two days, then water when the soil is barely moist. At this point, I check with a moisture meter and water when on the low side of moist. It is important not to overwater, keeping the excess soil mix from becoming water-soaked. It is also important not to allow the root zone to become dry.

Fertilizing – Throughout the growing season

When: Apply Excalibur VI every six months, Foliar feed every two weeks to every month with BioBlast.

What: Excalibur VI 11-11-13, BioBlast 7-7-7, Vitazyme and Carl Pool’s Root activator

How: After 6 months, I spread 3 or 4 tablespoons of Excalibur VI on the top of the soil and mix in the top 1-2” of the soil. The seedling should still be in the 7 1/2 gal squat pot. Foliar feed with BioBlast 1 oz to 1 gallon and Vitazyme 1 oz to 1 gal every month or less. Drench with Vitazyme and Root Activator in the Early Spring or if transplanting.

Why: Excalibur provides a balanced slow-release fertilizer specifically designed for plumeria.  BioBlast works with every part of your plant. Soil organisms are invigorated with Vitazyme bio-stimulants providing quicker, more vigorous growth. Roots are encouraged with our Root Activator. 

If possible, do not let seedlings go dormant their first winter. You can treat seedlings as adult plumeria after the first growing season.

Keep looking for more space, they will grow!

A Guide to Growing Plumeria From Seed

What the Difference Between Cutting, Rooted and Grafted Plumeria

The Difference Between Cutting, Rooted and Grafted Plumeria

When looking for plumeria it helps to know what to look for and what to expect if you are getting a plumeria cutting, a rooted Plumeria, or a grafted Plumeria.

A Plumeria Cutting is a tip of a branch cut from a donor plumeria, usually about 10″-18″ long depending on the donor plumeria growing habit. Cuttings do not have roots, but have been allowed to callus (callusing allow the cutting to form a tissue that allows roots to grow) Cuttings are sold only in the Spring and Summer months. Cutting makes specifically for grafting are called scion and are 6″-10″ long depending on the donor plumeria. A plumeria cutting will eventually have to be rooted for it to survive.

A Rooted Plumeria is a plumeria cutting that has been allowed to grow its own root system. For plumeria cutting to form root will take 6-8 weeks under ideal conditions or may take many months. Rooted plants should be allowed to grow roots for at least 4 months prior to winter.

A Grafted Plumeria is a plumeria cutting (scion) that has been grafted to an already mature root system (rootstock). It takes about 3 weeks after grafting before it is ready to ship. Grafted plants are grafted to root systems approximately 18 to 24 months old, depending on the diameter of the Cutting.

Why and How to Use Vitazyme

Why and How to Use Vitazyme

Vitazyme is a liquid concentrate microbially synthesized from plant materials and then stabilized for long life. Powerful but natural biostimulants contained in the material greatly benefit plant growth and soil conditions to boost growth and profits for the grower.

Vitazyme is non-toxic. It is organic, safe, and sustainable and has an array of active agents, including:

Known Ingredients in Vitazyme (all derived from natural materials):

Brassinosteroids 0.022mg/ml
1-triacontanol 0.33 ug/ml
Vitamin B1 (thiamin) 0.35 mg/100g
Vitamin B2 (riboflavin 0.25 mg/100g
Vitamin B6 0.15 mg/100g

Vitazyme is an all-natural liquid “biostimulant” for soil organisms and plants that contain certain biological activators, which are by-products of a proprietary fermentation process. These active agents include vitamins, enzymes, and other powerful but gentle growth stimulators such as B-vitamins, triacontanol, glycosides, and porphyrins.

Vitazyme, used within the context of a common-sense management system, will help the farmer overcome many of his production problems. While not a “magic bullet,” it helps the entire system work better.

Agriculture of today must emphasize the use of biological systems — not strictly chemical approaches — to achieve long-term soil productivity.

The product promotes soil life by conforming with natural laws, encouraging natural predators to control insect and nematode pests, promoting more intensive biological nitrogen fixation, and by stimulating natural rhizosphere organisms to produce needed plant growth factors.

Investigations are continuing on other components:

Likely phytoactive components which will be discovered include the following:

  • Various porphyrins (chlorophyll derivatives)
  • Various glycosides (glucose derivatives)
  • Salicylic acid or salicylates
  • Amino acids such as methionine and others
  • Nucleic acid remnants or precursors
  • Nucleotides, especially adenine but possibly others
  • Gallic acid
  • Glucuronic acid
  • Various enzymes

Benefits to Soils

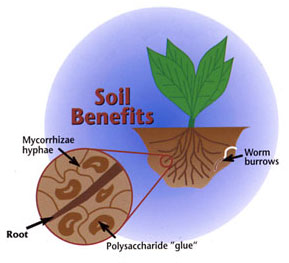
Soil structure, so critical for air and water movement through the soil to facilitate root growth and nutrient uptake, is improved by Vitazyme in at least four ways:

  1. Increased root growth (more root channels).
  2. More polysaccharides glue particles together; only 0.2% more polysaccharides can markedly improve structure.
  3. Improved mycorrhizae activity (creating sac-like structures)
  4. Greater earthworm activity, their burrows create channels for air and water. Water infiltration is increased, and runoff and erosion are consequently decreased. Compaction is reduced so roots can freely explore the soil for nutrients and water, increasing yields.

How Vitazyme benefits Plumeria

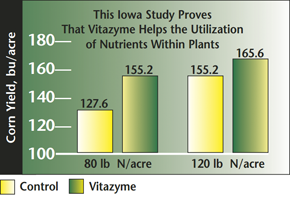
Vitazyme will increase chlorophyll first, allowing the plumeria to harness more energy from the sun. The plumeria will develop a larger and more efficient root system and working in conjunction with the microbial population in the rhizosphere will convert more nutrients from a non-uptake able form to forms that can be taken up by the plumeria. In this way, the soil system becomes more efficient and is the main reason why we say you can lower your nutrient inputs using Vitazyme. This, in part, explains the typical results of greater yield and quality measures for any crop.

  • Greater root and leaf growth
  • More and bigger blossoms
  • Improved soil conditions
  • Inexpensive, very cost-effective
  • Easy to use
  • Safe and non-toxic
  • Can be seed-applied
  • Can be tank-mixed with any liquid fertilizers, herbicides, and pesticides
  • Can run through irrigation lines without clogging
Soil Benefits

Corn Yield

Vitazyme applied through the irrigation system–drip, sprinkler, or sprayed–will accelerate the growth and maturity of plumeria, in containers or in the ground. Trunk caliper will increase faster as photosynthesis and leaf areas are accelerated. Vitazyme will improve the roots, leaf, and flower growth.

Treated seeds will emerge faster, and seedling growth will be more vigorous. Improved chlorophyll development will give faster nutrition, deeper green colors, and more lustrous and attractive leaves. Vitazyme will also aid in the early development of flowers.

Expect better tilth and permeability in your soil with Vitazyme use.


Vitazyme Science

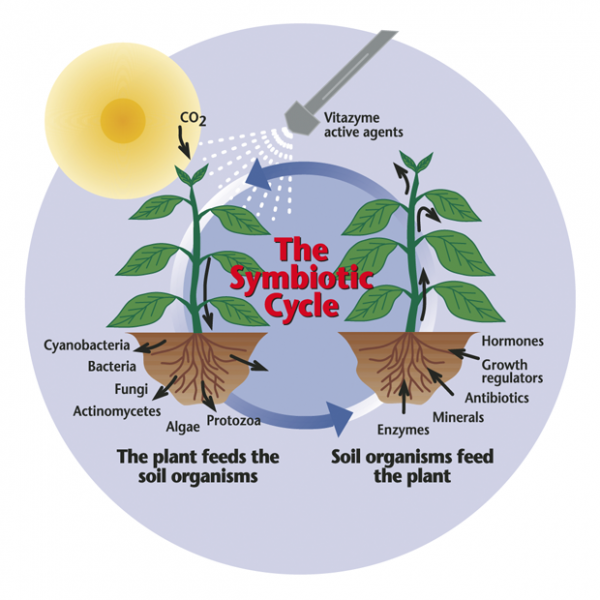
Vitazyme intensifies the activity of the plant-soil system. Photosynthesis is increased, so more carbon from the air is fixed into plant tissue. Energy-rich compounds produced in the leaves by this vigorous metabolism move into the root system and out into the soil, or media where billions of bacteria, algae, fungi, protozoa, and other organisms feed on this energy. The organisms, in turn, release minerals and growth stimulants for plant uptake…a beautiful symbiosis. Plant stress is reduced, removing growth and yield limitations.

Vitazyme Stimulates Rhizosphere Symbiosis

Vitazyme contains “metabolic triggers” that stimulate the plant to photosynthesize better, fixing more sunlight energy in the form of carbon compounds to increase the transfer of carbohydrates, proteins, and other growth substances into the root zone. These active agents may enter the plant through either the leaves or the roots. Root growth and exudation are both enhanced. This enhancement activates the metabolism of the teeming population of rhizosphere organisms to a higher level, triggering a greater synthesis of growth-benefitting compounds and a faster release of minerals for plant uptake. The plant microbial symbiosis is stimulated.

Symbiotic Cycle

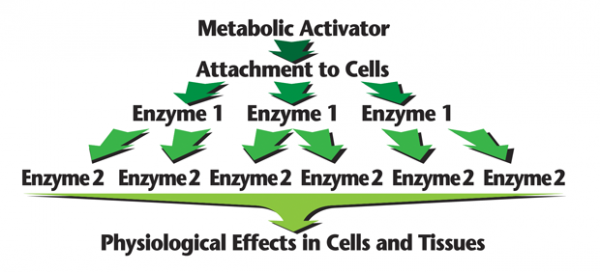
The Enzyme Cascade Effect

Very small amounts of these metabolic triggers in Vitazyme are needed to greatly improve plant and rhizosphere microbe response. This is because of the enzyme cascade effect. Successive tiers of enzymes are activated in plant and microbial tissues to yield a large physiological response from a very little applied activator.

In short, Vitazyme enables the plant to better express its genetic potential by reducing the stresses that repress that expression.

Cascade effect

Improved Symbiosis: The Secret of Vitazyme’s Action

All plants that grow in soils develop an intimate relationship between the roots and the organisms that populate the root zone. The teeming billions of bacteria, fungi, algae, cyanobacteria, protozoa, and other organisms that grow along the root surfaces—the rhizosphere—are much more plentiful than in the bulk of the soil. This is because roots feed the organisms with dead root epidermal cells as well as compounds exuded from the roots themselves. The plant may inject up to 25% or more of its energy, fixed in the leaves as carbohydrates, amino acids, and other compounds, into the root zone to feed these organisms… for a very good purpose.

The microorganisms which feed on these exuded carbon compounds along the root surfaces benefit the plant in many ways… a beautiful symbiotic relationship.

The plant feeds the bacteria, fungi, algae, and other microbial species in the rhizosphere, which in turn secrete enzymes, organic acids, antibiotics, growth regulators, hormones, and other substrates which are absorbed by the roots and transported to the leaves. The acids help dissolve essential minerals, and reduced iron releases anionic elements.

A few important microbe groups are listed below.
Mycorrhizae Mycorrhizae, especially vascular-arbuscular (VAM) tyes, form “arbuscules” within root cortical cells and extend thread-like hyphae into the soil, increasing the root feed surface by ten times or more. They are the major means for uptake of phosphorus, copper, zinc, and other less mobile elements. They also can extract water under much drier conditions than can root plants.
Cyanobacteria Cyanobacteria fix carbon (they photosynthesize), and also fix nitrogen from the air for plant use.
Phosphate-dissolving bacteria Phosphate-dissolving bacteria excrete acids that dissolve minerals and release hard-to-get phosphorus.
Azotobacter Azotobacter species live on exudates and other carbon sources while fixing nitrogen.
Actinomycetes Actinomycetes generate a variety of pathogen-fighting antibiotics.


How to Use Vitazyme with Plumeria

Potted Plumeria and Typical Gardens

Simply use Vitazyme once a month during the growing season.  You can drench or water Vitazyme by hand at a rate of .9% (1 oz./gallon) over top of both the plumeria and the soil.  Of course keep in mind watering times, not because Vitazyme will burn a plant (it certainly won’t), but rather follow good practices to reduce mildews and enhance water conservation.

You can also apply Vitazyme with any spray tank.  We would recommend a 4% (5 oz./gallon) rate sprayed directly on the plants until run-off. Vitazyme will flow through all spray rigs, irrigation rigs including drip irrigation, and through seeders with an in-furrow injection so you don’t have to worry about clogging, and have many options for applications.

A good sized garden will use less than a gallon of Vitazyme per season. Vitazyme can be stored almost indefinitely, so any leftover will be good the following season, and not wasted.

Vitazyme can tank mix with any herbicide, fungicide, pesticide, or fertilizer without issue, we always recommend applying Vitazyme as part of your individual fertility/control programs. This way you will save on application costs for Vitazyme alone.  Vitazyme is flexible enough so that if the recommended timing of applications varies a bit from your typical practice, you can still use it and gain valuable results.

Generally, plumeria will use 4-5 applications over the growing season. This will be defined more specifically in the guide.  Remember, the guide is just that, a guide.  Your growing conditions will help to dictate the exact timing of applications.

Vitazyme should be used within the context of a complete crop management system, never by itself. Vitazyme will optimize your existing program by enabling your plumeria to utilize soil fertility and water more efficiently while reducing costs and increasing productivity. This product is very effective with low nitrogen. Follow this easy-to-use five-point program.

  1. If possible, analyze the soil at the USDA or a reputable laboratory and correct mineral deficiencies and imbalances with expert consultation.
  2. Treating plumeria seeds or transplant roots, if possible, at planting. Treat seeds with a diluted Vitazyme solution, such as a 5% solution (4 oz./gallon). For excellent results, dip the seeds in the solution and allow to dry. For transplanting soak for approximately 30 minutes or spray transplant roots with a or 2% solution (2.5 oz./gallon).
  3. Apply Vitazyme to the soil in Early Spring. After the initial application Vitazyme can be applied monthly. A fall application on the soil is effective to accelerate residue breakdown.
  4. Integrate other, sustainable management practices into the total program.

Application Rates

  • Seeds, Cuttings, and Transplants. For faster emergence and rooting, dilute at a rate of 1 oz/19 oz of water (a 5% solution) and mist all exposed areas. Allow seeds to dry prior to planting.
  • Potted Plumeria Application. For drenching, dilute at a rate of 1 oz/99 oz of water (a 1% solution). For foliage spraying, dilute at a rate of 4 oz/gallon (a 5% solution)
  • In-Ground Plumeria (for all temperate fields). Drench or spray Foliage dilute at a rate of 4 oz/gallon (a 5% solution)
  • Soil Conditioning (for all temperate fields and in-ground plumeria). Apply 4 oz/gallon (a 5% solution) before ground freezing

Tips

  • Vitazyme may be tank-mixed with fertilizers, herbicides, fungicides, and pesticides.
  • Vitazyme does not need to be tilled into the soil after application.
  • The dilution rate is not critical as long as the proper application is made.
  • Soil moisture is needed to activate Vitazyme.
  • Vitazyme can be stored almost indefinitely, so no loss of investment.

Proven Efficient

Vitazyme used with your normal, sound plumeria management practices Vitazyme will increase your yields sufficiently so that you realize a substantial increase in plumeria health and productivity.

You will find that you can reduce your nitrogen input, usually between 25% and 50%, and obtain the same or higher crop yields. Nitrogen is rising in cost and is likely to remain high in the future. Saving money on your fertilizer purchases will increase your profits when using Vitazyme.

Why Use Vitazyme

Why Use Vitazyme

Vitazyme is a liquid concentrate microbially synthesized from plant materials and then stabilized for long life. Powerful but natural biostimulants contained in the material greatly benefit plant growth and soil conditions to boost growth and profits for the grower.

Vitazyme is non-toxic. It is organic, safe, and sustainable and has an array of active agents, including:

Known Ingredients in Vitazyme (all derived from natural materials):

Brassinosteroids 0.022mg/ml
1-triacontanol 0.33 ug/ml
Vitamin B1 (thiamin) 0.35 mg/100g
Vitamin B2 (riboflavin 0.25 mg/100g
Vitamin B6 0.15 mg/100g

Vitazyme is an all-natural liquid “biostimulant” for soil organisms and plants that contain certain biological activators, which are by-products of a proprietary fermentation process. These active agents include vitamins, enzymes, and other powerful but gentle growth stimulators such as B-vitamins, triacontanol, glycosides, and porphyrins.

Vitazyme, used within the context of a common-sense management system, will help the farmer overcome many of his production problems. While not a “magic bullet,” it helps the entire system work better.

Agriculture of today must emphasize the use of biological systems — not strictly chemical approaches — to achieve long-term soil productivity.

The product promotes soil life by conforming with natural laws, encouraging natural predators to control insect and nematode pests, promoting more intensive biological nitrogen fixation, and stimulating natural rhizosphere organisms to produce needed plant growth factors.

Investigations are continuing on other components:

Likely phytoactive components which will be discovered include the following:

  • Various porphyrins (chlorophyll derivatives)
  • Various glycosides (glucose derivatives)
  • Salicylic acid or salicylates
  • Amino acids such as methionine and others
  • Nucleic acid remnants or precursors
  • Nucleotides, especially adenine but possibly others
  • Gallic acid
  • Glucuronic acid
  • Various enzymes

Benefits to Soils

Soil structure, so critical for air and water movement through the soil to facilitate root growth and nutrient uptake, is improved by Vitazyme in at least four ways:

  1. Increased root growth (more root channels).
  2. More polysaccharides glue particles together; only 0.2% more polysaccharides can markedly improve structure.
  3. Improved mycorrhizae activity (creating sac-like structures)
  4. Greater earthworm activity, their burrows create channels for air and water. Water infiltration is increased, and runoff and erosion are consequently decreased. Compaction is reduced so roots can freely explore the soil for nutrients and water, increasing yields.

How Vitazyme benefits Plumeria

Vitazyme will increase chlorophyll first, allowing the plumeria to harness more energy from the sun. The plumeria will develop a larger and more efficient root system and working in conjunction with the microbial population in the rhizosphere will convert more nutrients from a non-uptake able form to forms that can be taken up by the plumeria. In this way, the soil system becomes more efficient and is the main reason why we say you can lower your nutrient inputs using Vitazyme. This, in part, explains the typical results of greater yield and quality measures for any crop.

  • Greater root and leaf growth
  • More and bigger blossoms
  • Improved soil conditions
  • Inexpensive, very cost-effective
  • Easy to use
  • Safe and non-toxic
  • Can be seed-applied
  • Can be tank-mixed with any liquid fertilizers, herbicides, and pesticides
  • Can run through irrigation lines without clogging
Soil Benefits

Corn Yield

Vitazyme applied through the irrigation system–drip, sprinkler, or sprayed–will accelerate the growth and maturity of plumeria, in containers or in the ground. Trunk caliper will increase faster as photosynthesis and leaf areas are accelerated. Vitazyme will improve the roots, leaf, and flower growth.

Treated seeds will emerge faster, and seedling growth will be more vigorous. Improved chlorophyll development will give faster nutrition, deeper green colors, and more lustrous and attractive leaves. Vitazyme will also aid in the early development of flowers.

Expect better tilth and permeability in your soil with Vitazyme use.


Vitazyme Science

Vitazyme intensifies the activity of the plant-soil system. Photosynthesis is increased, so more carbon from the air is fixed into plant tissue. Energy-rich compounds produced in the leaves by this vigorous metabolism move into the root system and out into the soil, or media where billions of bacteria, algae, fungi, protozoa, and other organisms feed on this energy. The organisms, in turn, release minerals and growth stimulants for plant uptake…a beautiful symbiosis. Plant stress is reduced, removing growth and yield limitations.

Vitazyme Stimulates Rhizosphere Symbiosis

Vitazyme contains “metabolic triggers” that stimulate the plant to photosynthesize better, fixing more sunlight energy in the form of carbon compounds to increase the transfer of carbohydrates, proteins, and other growth substances into the root zone. These active agents may enter the plant through either the leaves or the roots. Root growth and exudation are both enhanced. This enhancement activates the metabolism of the teeming population of rhizosphere organisms to a higher level, triggering a greater synthesis of growth-benefitting compounds and a faster release of minerals for plant uptake. The plant microbial symbiosis is stimulated.

Symbiotic Cycle

The Enzyme Cascade Effect

Very small amounts of these metabolic triggers in Vitazyme are needed to greatly improve plant and rhizosphere microbe response. This is because of the enzyme cascade effect. Successive tiers of enzymes are activated in plant and microbial tissues to yield a large physiological response from a very little applied activator.

In short, Vitazyme enables the plant to better express its genetic potential by reducing the stresses that repress that expression.

Cascade effect

Improved Symbiosis: The Secret of Vitazyme’s Action

All plants that grow in soils develop an intimate relationship between the roots and the organisms that populate the root zone. The teeming billions of bacteria, fungi, algae, cyanobacteria, protozoa, and other organisms that grow along the root surfaces—the rhizosphere—are much more plentiful than in the bulk of the soil. This is because roots feed the organisms with dead root epidermal cells as well as compounds exuded from the roots themselves. The plant may inject up to 25% or more of its energy, fixed in the leaves as carbohydrates, amino acids, and other compounds, into the root zone to feed these organisms… for a very good purpose.

The microorganisms which feed on these exuded carbon compounds along the root surfaces benefit the plant in many ways… a beautiful symbiotic relationship.

The plant feeds the bacteria, fungi, algae, and other microbial species in the rhizosphere, which in turn secrete enzymes, organic acids, antibiotics, growth regulators, hormones, and other substrates which are absorbed by the roots and transported to the leaves. The acids help dissolve essential minerals, and reduced iron releases anionic elements.

A few important microbe groups are listed below.
Mycorrhizae Mycorrhizae, especially vascular-arbuscular (VAM) tyes, form “arbuscules” within root cortical cells and extend thread-like hyphae into the soil, increasing the root feed surface by ten times or more. They are the major means for uptake of phosphorus, copper, zinc, and other less mobile elements. They also can extract water under much drier conditions than can root plants.
Cyanobacteria Cyanobacteria fix carbon (they photosynthesize), and also fix nitrogen from the air for plant use.
Phosphate-dissolving bacteria Phosphate-dissolving bacteria excrete acids that dissolve minerals and release hard-to-get phosphorus.
Azotobacter Azotobacter species live on exudates and other carbon sources while fixing nitrogen.
Actinomycetes Actinomycetes generate a variety of pathogen-fighting antibiotics.

Why Use Carl Pool Root Activator

Why Use Carl Pool Root Activator

Carl Pool Root Activator is a 100% natural product that safely promotes the regeneration of roots through increased elongation rates. Root Activator stimulates fast root growth, reduces transplant shock, and hastens plant establishment. Use on all newly planted or transplanted plants and soil, and any time additional root growth is desired to reach the potential of underperforming plants.

Carl Pool’s Root Activator contains 7.5% glycosides. It prevents transplant shock and stimulates fast root growth.

  • Concentrated Formula
  • Prevents Transplant Shock
  • Stimulates Fast Root Growth
  • Increases Plant Root Mass

Ingredients:

Active:

Glycosides 7.5%
Gibberellin 0.03%
3-Indoleacetic Acid 0.02%
Kinetin 0.02%

Inert: 92.43%

Description: Natural glycosides derived from pecan shells and water. Glycosides are compounds that comprise a wide array of substances that make up a significant proportion of the cellular and tissue contents of plants and as a critical influence on plants in the roots, stem, and leaf development. Beneficial flavonoids often occur as glycosides; some important as coloring agents for flowers to attract insects and birds while others promote disease resistance. Carl Pool Root Activator prevents transplanting shock and stimulates fast root growth and forking of the root system.

Application Recommendations:

  • Mix 1 pint to 5 gallons of water or 8 Tbsp. to 1 gallon of water. Saturate the entire root area of a plant. Repeat every 30 days until desired results are achieved.
  • Plumeria plant in containers: Use from 1 to 5 gallons of the diluted solution around each plant depending on the size of the pot and root area.
  • Plumeria Trees in Ground: Saturate the entire area within the drip line. Use from 3 – 10 gallons of the diluted solution around each tree depending on the size of trunk diameter.

Water Rooting vs Soil Rooting Plumeria

Rooting Cutting, is there a right way?

Is rooting in water the best way for Plumeria?

Although people have been rooting plumeria in water with some success, this is not the best way to root your plumeria. The roots that form in water are not the same as roots that form in the soil. They are fragile and brittle, adapted to growing in water as opposed to soil. Once you transfer a water-rooted plant to the soil, many of these roots will break off immediately and the rest will shrivel and die up as they’re replaced by the more robust roots adapted to the soil.

If you do water root, Just remember once a plant is in water, it will develop “water roots” and feed itself with water nutrients. When you put it in soil, after all that is where they grow naturally, the first week, keep it in a cup, so the soil is really wet, puddle like, then gradually as the weeks go by, decrease the water and just let the soil be moist.

That way, it eventually will resend out new dirt roots, and can feed itself accordingly.

Is rooting in the soil the best way for Plumeria?

Rooting in the soil is the best way to get strong roots,

To get the best results, follow these simple steps:

  • Use healthy cuttings, preferably from newer growth. Take the cutting with a sharp knife or cutters. Although it depends on the cultivar, most cuttings should range from ten to fifteen inches.
  • Trim the cutting of all leaves. Leaves will cause the cutting to lose valuable moisture. If you’re using a rooting hormone apply immediately after taking the cutting.
  • Plant the cutting in your potting medium. Lightly tamp the mix around the stem of the cutting to provide support.
  • Water the soil well and place it in a warm dry area. Most plumeria cuttings do well in full sun while they root. Cuttings thrive on warmth and humidity, but the potting soil should drain well and kept dry after the first watering. A good rooting mix is 1 part potting soil mix with 1 part perlite. Misting the cutting is ok if you see signs of wrinkling.

When you see 3-4 new leaves and the new plant is established with healthy root growth. Transfer it to a new pot with fresh well-draining potting soil.

And that’s it! You can root most cultivars from cuttings, but if you find that you’re having a hard time with any particular cultivar, make sure you’re not overwatering.  For difficult to root plumeria cuttings, try a plant grow mat placed under the pots to encourage new root growth or try grafting.

Plumeria roots grow best when the root zone temperature is between 75 and 95 degrees.